Thursday, January 31, 2013

You Can Tell

I am definitely feeling much better. For starters, I got my hair cut! It turned out really cute this time too. Probably helped that I had lots of hair for my hairdresser to play with, huh? At least now I’m not drowning in my bangs. I could just hear my dear old dad grumping at me from my teenaged years, “Get that hair out of your eyes!” It was looking exactly like it did when I was 15. Thanks, Poppy.

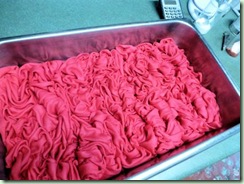
I also dyed my fabric for my next dress. I did all the usual things. First I soaked the already washed cotton/lycra interlock. Surprisingly more magenta dye was still bleeding out so I changed the soaking water a couple of times. Then I arranged it in my big stainless steel buffet tray. Of course it had to be scrunched up to fit:

MagentaInterlock_before

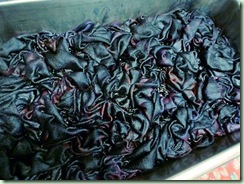
I mixed a teaspoon (approx. 5 gm) of each Procion MX dye into its own plastic cup and dissolved it with warm water. I used yellow-gold, emerald (a proprietary Maiwa colour), and navy. I began by drizzling over the yellow-gold and then the emerald (a quite bluish-green). Then I mixed up soda ash at 10% of the weight of the fabric (which was 750g x 10% = 75g) and dissolved it in hot water. I sprinkled about 2/3s of this soda solution over the fabric in the tray and poked it all in with a gloved hand. Lastly I used a teaspoon to splash some navy on anywhere where it was looking pale. By this point the fabric was very dark. I covered it all up with plastic so nothing would dry out:

MagentaInterlock_after

Since there was some of the navy dye and soda ash left, I stuffed a small plastic pail with a wet piece of cotton t-shirt knit, another one of the freebee fabrics from my former neighbour. I added a little warm water and the leftover navy dye. After about 15 minutes I added the rest of the soda ash solution and covered up the bucket with a lid.

The two dye containers were left overnight – not that they needed that long but because I ran out of time. Yesterday morning I rinsed out the fabric from the tray in cold water quite a few times. There’s always some wash-off of excess dye but this took a number of rinsings before it seemed to slow down. Then I plopped the fabric into the biggest dyepot with a splash of Synthrapol (which helps a lot with removing excess dye) and brought it up to a simmer on the dye stove. I also added the blue piece to the pot after rinsing it a few times too. It takes about 10 minutes at a simmer to remove any more excess dye:

FabricsSimmering

Lastly I squeezed out the water and put it the fabrics in the washing machine and ran them through a regular wash and then into the dryer.

The results were somewhat disappointing because one of the dyes I used (the emerald Procion MX) was D.E.A.D. I was wondering why there was so much green washing out in the rinse water! Unfortunately I figured it out around about 5 minutes into the simmering step. Doh. The emerald dye had been in the stash for quite awhile and was pretty old. Possibly decades. So I don’t really blame it for kicking the bucket. The other colours I used (yellow-gold and navy) stuck nicely. However that left a lot of magenta areas on the fabric. Yes, several of my Faithful Readers. You may now do the happy dance. Damselfly has fabric that is not Dull and Muddy! One must be accepting of the results that one achieves, right? Besides, it’s kinda pretty:

DyedMagentaInterlock

That’s just one little section to give you a hint. Now I can’t wait to make the dress. However, instead I’ve been stuck back into the Bra Wars. You know things are bad when you dream of bra pieces all night long! But darn it, I’m still not there yet. The cradle is good; the wires are fine but the cups…not so much. I made a tester bra and as I suspected I need to go back to the drawing board (literally) on the cups. I also need to pick out the cups and wires from the tester cradle in order to try again with new cups. Sigh. Why is it that I just can’t get this right? I’m so envious of the other lovely lingerie I’ve seen others make and I SO WANT SOME!! Grrrr….
Tuesday, January 29, 2013

Class Assignments

So here we are nearly at the end of January and I haven’t really accomplished what I was hoping to this month. Oh well. It’s not like I’m getting marked on my work or anything! I certainly haven’t earned too many gold sticker stars. I think I’ve learned a lot anyhow. I have been studying. The future will tell how much that will affect my projects. Knowledge isn’t much good sitting around in my head. I need to apply it to the real world.

I forget now on whose blog I read the recommendation (sorry!) but I recently picked up a digital copy of a book from 1998:

Linings book

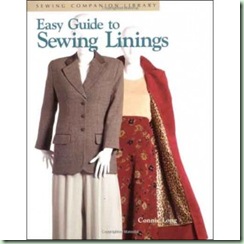
Easy Guide to Sewing Linings by Connie Long might be an oldie but it’s a goodie! (This link takes you right to the page on Taunton’s website. For less than $12 you can download the complete but otherwise OOP book.) If you were ever confused about lining vs underling or full vs partial linings or wondered how to make a pattern for a lining when yours doesn’t include one, this answers every question. I’m still savouring it a chapter at a time.

Another learning opportunity came recently when I finally succumbed to a class on Craftsy. I think the idea of well-produced and filmed lessons with the ability to message the instructor with questions is a good one particularly when the price includes permanent access. I never like being forced to show up to this kind of thing at a certain time or it all goes away. Of course you have to be realistic that as time goes on and the instructor goes on to other things, you might not get timely responses. So be it. I’ve heard that there have been issues with unanswered questions eventually disappearing from the site which I think is a little unfair. They need to date messages and possibly leave them up indefinitely. Perhaps they have server limitations. Who knows? The video lessons are still there and I haven’t had any difficulty watching them, even on my little netbook computer.

Anyhoo, I succumbed to Sew the Perfect Fit with Lynda Maynard and so far it’s quite good. There are several models with different body shapes to work with. Lynda doesn’t use a lot of measurements to start, just high bust, waist and hip and picks the pattern size from there. All the rest is done directly on the muslin. She has an interesting method where she blithely slashes with scissors along a line over the bust to add more room there – while the model is wearing the muslin. Yikes! Later the muslin changes are transferred back to pattern paper. The class is supposed to come with a Vogue pattern which of course I haven’t yet received even though it’s been about 3 weeks. Patience is a virtue, right? I don’t really care since I probably won’t get to this for at least another week or two.

Speaking of Vogue, I know I said that I wasn’t going to buy any more patterns since they take so much work to fit, but… I slipped and fell for the current sale on $3.99 Vogues at BMV. Oops. In my defence, I tried to pick things that would be difficult or impossible to draft myself. Ones where I admired what others have done with them and looked at over and over with covetous thoughts. Some Marcy Tilton, Sandra Betzina and a few others. More on this when the postman knocks.

I really enjoyed the bra sew-along over at Cloth Habit. Between blogger Amy and Norma of Orange Lingerie there was a lot of great information on fitting and customising. I joined the private Flickr group as well – even though I never made anything to upload – and diligently read all the comments on everyone’s fitting issues. I now have both books by Beverly Johnson (on DVD in PDF format) and have read every word. It’s lovely that she doesn’t overlap information – the second book adds to the first. Beverly has written these books for professional bra-makers so you might not need every tiny detail but I found it all quite fascinating. There are no other publications that go into this kind of depth on the single subject of making custom bras.

However even with all that studying I’ve been pretty much stymied by the bra-making experience. Again. Here’s where I’m at currently: I think I have a bra wire size that will fit. It in turn fits into a bra size pattern where the cups are absolutely gigantic on me! (I told you I had footballs – ones where half the air has been let out too. Heh.) So now I have to do one of two things: make a tester bra in the gigantic size and pin out all the extra fabric or use the information in Beverly’s second book and draft a pattern from measurements. I may have better success with the second method so I might just try it first. Eventually I’d like to get a basic pattern that fits so that I can experiment with different cup designs, particularly adding a “power bar”. My favourite unwired bra has that feature and it helps a lot to hoist things in at the sides and project them out front where they belong! I’m trying not to despair that I’ll ever get there.

I have really been procrastinating on the bra stuff though. I guess because I feel so frustrated with it! I know it’s just this blobby old body that’s giving me the usual fitting issues. However I am nothing if not stubborn and persistent, so I keep pegging away at it but in short bursts so I don’t get too cranky. Meanwhile, I’ve been pattern fitting for another knit dress:

B5246

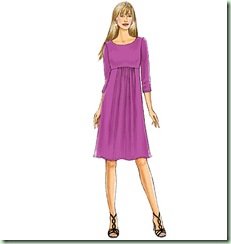
This is Butterick 5246, View A. I also liked View B with the cowl but although I adore cowls, I find that they limit the wearability somewhat. I can’t wear my usual scarves and they don’t always fit under outerwear comfortably. So instead I decided to go with the regular neckline and hope for more wearing options. I also decided to leave off the twee back ties and plan to turn under the neckline instead of completely lining the bodice. The fabric I want to use is a beefy cotton/lycra double-knit, one of four pieces of this that I got in the free box when my across-the-street neighbour moved out. The only drawback is that it’s all screaming hot fuchsia pink! Not my most favourite colour. The fun exercise will be trying to overdye such an intense colour to get something I’m happier with. Since I have 4 lengths of just under 2 yards each and it didn’t cost me anything, I can go crazy without fear of ruining it. I’m planning to do a low-water immersion dye for the first try and use navy and emerald over it which should tone things down some. It’ll be like a print only not actually printed, if you get what I mean! Judging by the results of this first overdye will help me decide what to do with the other 3 pieces.

So I’ve already got the pattern adjusted. (Must have been feeling somewhat better, huh?) I used my basic stretch blocks for the bodice’s neck and shoulders and the sleeves. My sleeve is inches narrower than the smallest size at the cap! I also had to lower the yoke line an inch since it was about to cut across right at the bust. Then I added inseam pockets while I was at it. I discovered that if I cut the back with a seam, I can fit this pattern on much less yardage plus I can shape the back a little to prevent gapping at the neck and waist. Just to give you an idea how much fabric my pattern changes saved, the original View A calls for 2.4m of 150cm wide. I fit it on about 1.5m of slightly narrower width thus saving nearly a whole metre. To be fair, I would probably have used the bodice facings if I was making this out of a flimsier knit. BTW, interestingly nobody on PatternReview managed to make the overlay View C work for them and only one person actually kept the ties.

Now off to dye!

Thursday, January 24, 2013

Kumihimo

I just thought I would write a little more information about kumihimo and my longstanding interest in this particular craft – just in case any of my Dear Readers are unfamiliar with the details. Braiding in general is the interlacement of threads or groups of threads using one set of elements, as opposed to weaving which uses 2 sets (warp and weft). The simplest braid (aka plait) is the 3-strand one we all learn to make in our hair. Braiding goes back to prehistoric times and creates strong narrow ropes or ties for a multitude of uses. Kumihimo (which means “interlaced threads”) was originally used in Japan to lace together samurai armour and to wrap the handles and scabbards of swords. The material of choice has always been silk. Later the fashion was for a braid to decorate the obi that wrapped around kimono. Currently braids are used in decorative items such as jewelry, key fobs, hair ties, bookmarks etc. Cheaper rayon threads have become more commonly used than silk.

Of course these braids are not done just in one’s hands like their South American counterparts! There are a number of tools and stands (sometimes referred to incorrectly as “looms”). A popular and inexpensive way to work kumi braids is on a cardboard or foam circle or square with notches around the perimeter. This works fine for simple braids and is very portable but IMHO it’s not nearly as easy or as much fun as working on a marudai (round stand). I always make way more mistakes on the cards and my tension is far from even even with a small counterweight.

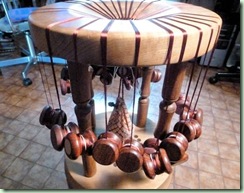
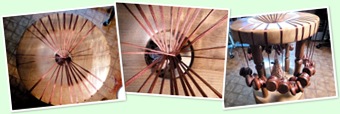
My marudai was made by my resident woodturner, T-Man, (of course!) and although not particularly traditional in shape it works really nicely. The woods are Oregon myrtle for the mirror and base with mahogany legs plus a number of colourful exotic wood dots on the base. My 70g tama (lead-weighted bobbins) were made by Peter Berlin in padauk wood. Because you will not get me to kneel on the floor in the traditional position, my marudai needs to be set on a small stool to reach the correct height for me to sit in a low chair to braid.

KyorakuGumi_tama

The bag hanging in the middle holds the counterweight (lead fishing weights) at approximately half the combined weight of the tama. You braid by lifting the correct threads (not the tama!) and swinging them around the mirror (top of the marudai) into their new place. The moves are two-handed and most of them are symmetrical or oppositional making it like a dance. That’s where the fun comes in!

Besides the marudai there are other stands for different types of braiding:

  • Kakudai (square stand) which has a peg instead of a hole in the middle and the braid proceeds upwards hung by a “gibbet” and a counterweight system. It works well for braids with twisted elements.
  • Takadai (high stand) looks a lot more like a loom right down to the beater sword (hera). It’s used for wide flat oblique braids.
  • Ayatakedai (wooden stand) is similar to the takadai but has “feathers” (hane) in front that support the bobbins. The braids made on this stand are warp-twined.
  • There’s also a combination takadai/ayatakedai stand, dubbed an ayatakadai by Aiko Sakai, which is convertible.

As you might imagine, the possibilities are pretty endless! (I’ve coveted a takadai for years. I have the plans for building one. Sadly I don’t actually have a takadai. Yet.) The only North American supplier for all things kumihimo is BraidersHand in Washington State. Janis Saunders is the proprietor and her husband builds the equipment to specs that have been vetted by Roderick Owen and Makiko Tada, both world-renowned braiders and authors of a number of books on the subject. They are lovely people to deal with.

So where did I get interested in this particular textile art form? Somewhere back in the early 1990’s a friend had taken a seminar with Rod Owen and showed me how to do a simple braid on a cardboard square. I was enchanted! Later I travelled to Victoria, BC several times to take workshops with Shirley Berlin, who had studied with Rod who had studied with Makiko, whose mom was the aforementioned Aiko Sakai. (There’s a continuous braid here! Get it?) I also managed to take several seminars with Makiko at various weavers’ conferences. Other than that, the rest I learned from books and just by trying it. I did join the Complex Weavers’ Kumihimo on the Marudai group for a number of years where we exchanged lots of samples with braiding instructions included. Some of the challenges were very exciting, using untraditional materials and experimenting with interlacements. Unfortunately now I mostly just have a tangle of braid samples to show for my kumihimo curiosity rather than any spectacular finished pieces. But dear Shirley would have me tell you that there are indeed many uses for braids! Limited only by your imagination.

If anyone is interested in learning more about kumihimo, I have some files of teaching materials from when I did several workshops for my weavers’ guild. Just contact me privately with your email. Even though I’m not teaching now, I’m always happy to addict another happy fibreholic! Plus there are several ways to create a “quick-and-dirty” marudai. One good one is to drill a hole in the top of a stool. Bobbins can be quickly made with large nuts and bolts. More info in my handouts.

So. On another subject entirely, I haven’t yet showed this FO:

Ruby Sockhead Hat

Sockhead

Begun: December 29, 2012
Completed: January 17, 2013

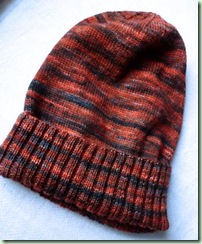
Yarn: Newton’s Yarn Country Happy Feet sock yarn, colourway reds/blues, 100% superwash merino, used .2 (360 yds) of the original .71 lb. (1278 yds) skein. Only a few yards left.

Pattern: Sockhead Hat by Kelly McClure, free pattern on Ravelry http://www.ravelry.com/patterns/library/sockhead-hat

Comments: Very easy pattern to knit so it’s a perfect TV project. The slouchy shape is a different one for me but it’s great for bad hair days like when I need my hair cut badly! This uses up the last of this monster skein of sock yarn. I now have a whole matching wardrobe of accessories – hat, fingerless mitts, and knee socks.

In health news, I’m still coughing but feeling somewhat more human again. We got in a huge restocking of groceries finally, changed all the linens and did laundry and vacuuming. I even made a big pot of soup. It’s amazing how much better one feels when the house isn’t quite such a pigsty! The Evil Bugs have merely stolen a whole month out of my life. Bleh.

I think I need to go make some cookies. Gluten-free oatmeal raisin. Cookies and a cup of tea always make you feel better.

Tuesday, January 22, 2013

Did She Make It In Time?

Yes, I finished the bookmark braid on time but it was a near squeak! I only had 2 days and it took 3 tries to get it right. First was a practise braid in some random weaving yarn of unknown fibre content (probably rayon). The colour was good but the results looked like cat yak and I kept breaking the east-west threads. Next I tried a new warp in shiny rayon machine embroidery thread in two shades of red (a brighter warm red and a duller purplish red): 10 doubled ends (one strand of each thread) 1 yd long per each north-south tama and 4 doubled ends 2 yds long for the east-west tama. That looked great, until I cut off the braid and found a big boo-boo on the back side. Bleh. Then I had an agonising few minutes while I tried to decide if there was enough left on the tama (weighted bobbins) to do a second braid. I didn’t want to start winding more thread and re-attaching them all to 24 tama. This was late Sunday afternoon and I was running out of time and energy. So I went with the thread I had left and there was just enough with maybe a bare few inches left over. Whew!

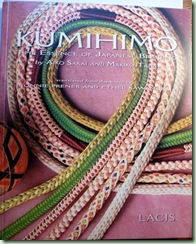
The braid was a new one for me from the “pink book” (aka Kumihimo: the Essence of Japanese Braiding by Aiko Sakai and Makiko Tada).

PinkKumiBook

Kyoraku Gumi is a 24 tama flat braid where the 20 north/south ends work in five 4-strand yotsu-gumi braids and then are crossed by 2 of the finer 4 east/west ends. Each group of 4 works only with itself so any colour possibilities would be limited to vertical stripes. I went with one blended colour over all. Yeah, I know this makes no sense if you aren’t a kumist! Sorry, it clarifies things for me to write them down.

Here’s the marudai (braiding stool) set up for braiding:

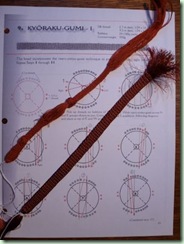
You can see how crowded the mirror is with so many tama on there! The braid itself wasn’t difficult. Really. Here’s the crappy practise piece and the first proper braid with glitch front and centre, though you might not be able to see it:

KyorakuGumi_samp

The pieces are lying on the first page of the braiding diagrams that I scanned so I could mark it up with pencil lines. That made it easier to see what I was doing for the first few moves. After that I didn’t need to look at all!

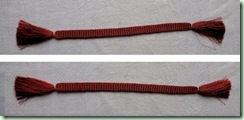
And here’s both sides of the final braid. To give you scale, it’s about 1/2” wide and 8” long between the tassels:

KyorakuGumi

I secured the ends with silver thread and trimmed the tassels with a really great technique I remembered. You wrap the tassel tightly with stiff paper and then trim with the ends sharp scissors right at the edge of the paper. The paper holds the slippery threads from moving and gives a straight line to cut against. Worked a treat.

I’m sorry that I didn’t get a photo of the braid with the guest book but here’s the pic that was sent to me so I could see what I was actually making the braid for. The book was made with a Coptic binding by another Guild member. You can just see the stitches at the edge of the cover. I think my red kumihimo bookmark looked very nice with the muted cover paper.

DSCN3550

It was such a sad but very loving day yesterday at my dear friend’s Celebration of Life. Over 200 family and friends (including a former city mayor) turned up proving that such an unassuming sweet person touched so many lives in a very positive way. We filled the main floor of Aberthau, the lovely old manse that is now part of a community centre and the place where my weavers’ and spinners’ guild hold our meetings. There were little arrangements of photos, flowers and memorabilia and a number of heartfelt speeches. Her poor husband looked lost and bereft. All the hugs in the world won’t help to fill the gap in all of our lives.

Since our Spectrum Study Group served as organisers of the CoL, I took the position of door greeter and hander-out of the program. T-Man schlepped a few chairs and we both spent time chatting with old friends, some of whom we hadn’t seen for years. After the speeches there were refreshments and an ongoing tea ceremony. I got to sit and have some matcha in a lovely tea bowl with the image of the rabbit and the moon which was one of my friend’s favourites. I guess Spectrum is going to have to decide whether or not to invite a new member. A replacement is not possible! However I think I’m going to have to assume her position of Official Lunchtime Reminder at our monthly get-togethers or we’ll all starve before we remember to eat.

Saturday, January 19, 2013

Another Week Tossed Into The Abyss

Sigh. My whining shall be limited to a quick update. Not only am I not really better yet, T-Man now has the flu. Lovely. It can’t be my bug because, hey, he had 3 whole weeks to catch it already. Weeks in which I was snivelling and coughing all over the house and over him too. No, he just had to go out and get a new and even more virulent version! Now whilst we lay about in bed, we’re arguing over who is well enough to go make a cup of tea for us both. Today I have to go wash yet another emergency load of hankies. We need groceries again. This is not fun. I want it over and done now.

OK enough of that. Moving right along. I have a couple of FOs. So what else did I have to do for weeks and weeks but read and knit? I’ll start with this one:

The Biggest Socks Ever

Biggest Socks Ever

For:  Youngest Nephew

Begun:  December 27, 2012
Completed:  January 13, 2013

Yarn:  Regia Design Line Kaffe Fassett, Colour 4256 (brown with flashes of blue, green, purple and darker brown), 75% superwash wool/25% polyamide, 50g = 210M. Took a little over 2 balls.

Pattern:  Damselfly’s Plain Socks on 72 sts, 9” before heel flap, 8.75” before toe decreases. Foot ended up 10.75” long.

Comments:  Yup, the usual boring plain socks. Youngest Nephew never got a pair of my socks before so he took advantage on Christmas Eve and requested some. He got to choose this yarn on Christmas Day from a couple of options which were somewhat limited since I knew I needed more than the usual 2 balls to finish. Now there’s enough yarn from the second 2 balls left to make some for me! I love this colourway.

Hope he likes them! Haven’t seen him yet to give them away.

I also finished another item but don’t have a photo ready yet. Let’s save that for another post. Of course nothing has been going on in the sewing department but I’ve been following along on Cloth Habit’s bramaking sewalong. I’m determined to get an underwired bra that fits me properly and comfortably! I also joined the Flickr group for the sewalong too. Whether or not I will be posting photos (not sure yet) I’ve still been learning a lot by seeing the fitting issues of others and the advice on solving them. Lovely brave women.

Best piece of information so far was to fit the underwires first, then the band and only lastly the cups. I realised that my previous bra sewing efforts were still not quite right because although the cups pretty much fit, the wires were still digging in at the sides. Who knew I needed absolutely huge wires even though all the measuring techniques tell me I’m a 36D? Arggh. No wonder RTW bras don’t fit unless they are the non-underwire type. If I get the wires right, the cups are way too big! Back to the drawing board. Literally.

To that end I ordered a package from Bra-makers Supply which included some new bigger wires to test and the next-up size range of the Pin-Up Girls Classic bra pattern. I also got Beverly Johnston’s second bra sewing book on CD. The first one that I got a year ago was eye-opening and this one just adds to the vast store of information! Fascinating stuff. Really. I’m still not quite up to diving in and making a tester bra muslin yet. Soon though!

Meanwhile I have to go make a kumihimo braid as a bookmark for the guest book for my late friend’s Celebration of Life on Monday. I hope I can do an adequate job since there will be many people of Japanese decent there. It inevitably makes me a little self-conscious! However all I can do is my best and know that will be just fine. Now I hope I can remember how to braid! It’s been awhile. Yes, there will be photos. More anon.

Friday, January 11, 2013

Snot Monster

Another of my all-too-common drive-by posts for you. Just so you don’t forget all about me. All is not hunky-dory in Damselfly’s Pond these days. For starters, the Evil Cold From Heck jump back on me with a vengeance just as I was starting to feel a little better. I barely made it through my dental cleaning yesterday without choking and coughing all over poor Viktoria, my lovely hygienist. I couldn’t afford to postpone the appointment and I figured since she was wearing a mask and gloves and of course autoclaves all her tools that I wouldn’t be passing anything on. Hopefully. Today I’m back in a vegetative state and contemplating how to accomplish a load of laundry just to have some fresh hankies. Again.

Next we have a short technical rant. Boredom warning. You might want to skip ahead. I’ve mentioned before that I like to use Evernote for clothing inspiration clips and to keep track of my future sewing plans. I had some trouble with the last update which seemed to have been solved by reverting back to the next-to-last software version. Unfortunately, yesterday after I spent several hours updating my notes on the Big Desktop Computer the stupid thing now won’t sync to the web for some reason. I keep getting error messages. I’ve done some research on the forums and there are a few things I can do to try to fix it before contacting tech support but I don’t have the patience or the brainpower right now to bother. (Zombie cold-bugs ate my brains!) I so hate it when things that worked just fine for ages suddenly decide to go bad on me. Bleh. Just when I was starting to get a little bit organised.

And, as if I wasn’t feeling sorry enough for myself, I just found out this morning that a dear friend has succumbed to the cancer that she was fighting for the last few years. She was the sweetest person ever and a year younger than I am. So that’s two people I’ve known for 25 years gone in just a month from the same disease. Cancer sucks. It’s just not fair at all. Yeah, I know. Who said life was fair?

The sun is finally out today after days and days of deep dark sogginess. It’s a little crisp but not too cold. Normally I would be leaping for the door to get out for a long walk. Not happening. Will Damselfly ever get her wings back? Stay tuned. And pass me a clean hanky, please.

Friday, January 04, 2013

Time Marches On

But I’m not marching anywhere at all. Still sitting around feeling sorry for myself knitting and reading and drinking copious cups of tea to stay lubricated. At least I don’t have any pressing appointments until I’m due at the dentist for a cleaning next Thursday. I’m desperately hoping I’ll be feeling much better by then. I can’t really reschedule the appointment. Plus I’m in dire need of a haircut which of course is in the opposite direction of the dentist’s office. Sheesh. Groceries might be good too. We’re scraping the bottom of the barrel here. Nice way to start a new year, huh? At least the future has to be looking up!

In my bored wanderings around the interwebs, I found a link from Stacy Sews for a free downloadable quilted pillow pattern from Tula Pink called Coastal Cruiser. No, I’m  not really a quilter but I do know how! And I have to make this. Soon. It’s a VW van! An older version with the rounded top and divided windshield so it doesn’t really look like our Fräulein (1989) but so cute! We need some new pillows in the living room anyhow. And I’m sure I can find all the ingredients in my stash somewhere. Even though the Pencil Princess has been using up all my fibrefill for her stuffies! Fibrefill is cheap. Or maybe I need to get a foam pillow form instead. Decisions. Decisions.

Nothing else at all interesting is happening at Damselfly’s Pond. Sniffle! You’ll have to come back later.

Thursday, January 03, 2013

Want Some Pie?

Pie charts, that is. I’ve seen so many on the sewing blogs that I managed to catch Pie Chart Fever! So I got my sewing stats together and hunted down an online maker (this one). And here’s the grand reveal:

chartgo1 
Click on it for a better view.

As you can see, I’ve got the biggest fondness for tops and tunics. Undies also rate highly probably because they don’t use much fabric and (with the exception of bras) they are fast and easy. This year I want to make more dresses and pants to round out my wardrobe a little better. We’ll see how that goes.

I also wanted to see where the patterns originated that I used:

chartgo2
Click on it for a better view.

This chart sure makes it obvious that I’ve been using my own pattern-making skills more than ever before! Of the Big 4 patterns, I sewed the most McCalls. The two Japanese books I used were Simple Modern Sewing and I Am Cute Dresses, both in English translations. I also sewed a couple of patterns from BurdaStyle magazine this year, even though I’ve pretty much stopped buying new issues. For simplicity’s sake I lumped together the independent pattern designers which include Maria Denmark, Dixie DIY, and the BurdaStyle website. These were all download-print-and-assemble patterns. The one indie printed paper pattern was the Pin-Up Girls bra which I ordered online. Apart from my own self-drafted ones, every pattern still needed some fitting adjustments, some of them fairly major. None of the other popular pattern companies sifted up to the top of the pile this year. Who knows what next year’s story will be, eh?

Enough retrospection. Did everyone enjoy ringing in the New Year? We tried to sleep through it but some folks were letting off firecrackers on-and-off for several hours. Just as we’d drift back to sleep…bam-bam-bam! And the ships out in the harbour always wake us up at midnight. They sound so cheerful with each one trying to out-blast the others! And of course the neighbours banging on the pots and pans. Then we had a fun New Year’s gathering of the clan at my dear brother-in-law’s. Apart from this stinkin’ cold (which I pray I didn’t pass on), I had a great time. Of course by the end of the evening, I was croaking and squeaking like a weird combination frog-mouse! Too much talking and laughing. I’ve been laying low ever since in an attempt to get over this darn bug. Nothing else of excitement has been going on though I’ve done a tonne of reading and some desultory knitting. I didn’t even get out to enjoy the sunshine that we’ve had for the last few days. Bleh. Hoping for better things soon.