Sunday, March 31, 2013

Happy Bunny & Egg Day!

We’re having a quiet one today here in Damselfly’s Pond. We had some grandbeastie time last weekend and 2 whole days and a night with the big ones coming up next weekend (yikes!) so the peace of today is to be savoured. No rampant monsters, dinosaurs or Barbie-mermaids. Just lots of warm sunshine and spring flowers. Awwww…

Not to worry. That bunny has been here. So what if they get their chocolates a week late? They’ll have had time to digest the first lot.

So meanwhile, what have I been up to? I spent Friday at our guild president’s house helping to create The World:

WorldMap

Needle felting on a wet-felted base. It’s not quite done yet here. It will be an important part of our guild booth at the upcoming ANWG conference in Bellingham. Hope I’m not giving too much away here so I’ll keep the concept quiet for now. Apparently the prez’s cat got up to mischief that night and tried to redesign some of our hard work with her claws! Naughty kitty. Luckily it was easily fixable.

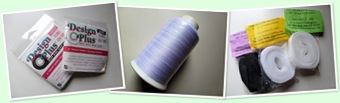
What else? Not a lot really. I’ve been slowly sewing my Bravo Bella bra kit using my own pattern:

BBBra_prog

I thought it was interesting how the cup pieces reflect the light differently due to the direction in which they were cut. Like jewel facets, no? The effect is much less obvious after they’re sewn together. I modified the pattern slightly yet again so we’ll see how this one comes out. The fabric was much too stretchy for me so I fused the lining to it with WonderUnder and that stabilised it very nicely. The back band pieces are not fused but have a layer of power net underneath. They are much more stretchy which you actually want in that part anyhow. The hooks are 3 x 3 instead of my usual 2 x 3 so I widened the band ends to accommodate this change. I know it seems like a lot of pieces for the cups but it really does make a difference in how well it supports. So far I’ve sewn the band and the cups and now need to attach them together. Plus I still have enough fabric left for another bra but not a matching one. The lining piece wasn’t as large as the fashion fabric so I’ll have to use something else. And of course get more elastics. I’m always buying more elastic! I never seem to have enough of the right ones.

I’m so looking forward to finishing the bra so I can get some new things cut out. I’m hoping for another session like I had last August when I just whipped out 5 things in a short time! Or not. I have no shortage of items to work on anyway. Whichever ones float to the top first? It’s a new season.

Definitely. The weather has been fabulous and sunny. You can practically watch things grow! The plum blossoms are out and the cherries aren’t far behind. You can smell them in the air. Yum. My rhubarb is growing and you can see the tips of the asparagus. I’ve been harvesting the walking onions, overwintering mizuna, kale buds, chives, parsley and corn salad. My little seedlings under the grow lights are starting to get their first set of true leaves. They’ll be needing transplanting to bigger flats soon and then we begin the yearly schlep in and out of the greenhouse until it’s warm enough for them to stay out overnight. I scaled back somewhat this year but I have to plant some things! Did I mention I got the peas in finally? Before April 1st. Yay.

If things are a bit quiet around here, I’ve had more sad news about friends and loved ones from several different directions recently. There’s nothing to be done really but it weighs on my usually disgustingly cheerful mind. When I’m unhappy I tend to want to clean something. I know! But it saves me from whining so much about how unfair life can be sometimes. When the going gets tough, the tough gets out the dust mop?

Off to sort laundry. Later, gators.

Wednesday, March 27, 2013

Sewing Lessons

The biggest grandbeastie, The Art Princess, had a fun overnighter with us while her brother stayed with their other grandmother and the parents had a dinner date. Of course she wanted to sew with Granny! This time I managed to convince her to try making real clothes so we made a skirt.

LittleSewist

Everybody sews in their nightgown, don’t they? We used some more of that bright magenta pink cotton/lycra interlock, the same freebee fabric that I dyed for my recent dress. Of course she liked the colour best in its unadulterated state! Though she did mention that it might be fun to have a dye day sometime. Anyway, it turned out a little long and a smidgen loose but since she’s growing like a weed it won’t be long before it fits just right. Here she’s showing off the designer label she made with a piece of grosgrain ribbon and a Pigma pen. This was totally her idea too. Other new experiences were using the rotary cutter and the serger (both with me hovering over biting my nails). She did pretty well and was proudly modelling her first Garment Make for her grandpa’s approval:

LittleModel

As you can see the colour works perfectly with nearly everything in her wardrobe! The skirt is not quite this long when standing but it’s actually my fault because when measuring I forgot that girls these days wear their bottom layers at the hip instead of the waist. I’m so old-fashioned, aren’t I? Get with the Twenty-First Century, Granny!

So what else? I finally got seeds planted under the grow lights. Lots are coming up after just a few days so I’m not quite as concerned about starting things too late. The weather has been delightfully sunny and relatively warm so spring is busting out all over around here! I would have my peas planted by now but I found out I don’t have any seeds left. We’re taking Nana to the garden shop on Thursday so it will have to wait until after that. I promise to get them in before April 1st.

Things have been kind of busy in the last while so not much else has happened in Damselfy’s Pond. It promises to continue busy too – at least into next week – which means it might be a bit quiet on the blog. More whenever!

Saturday, March 23, 2013

Springing Around

Yep, I’m still here. Just been a little busy. I had to finish making tassels for some of our guild bookmarks. These will be going in the goodie bags for the ANWG conference in Bellingham, WA in June. It was kind of tedious and they are nothing spectacular but it was a good way to play with colours and use up some small bits of yarny leftovers:

TasseledBookmarks

I also finished knitting the new Blodgie sweater, a little late now that hot water bottle season is coming to an end:

New Red Blodgie’s Sweater

BlackberryJuiceBlodgieSweater

Begun:  March 10, 2012
Completed:  March 20, 2012

BlackberryJuiceWoolYarnYarn:  No-name Aran-weight wool yarn (similar to Briggs and Little) from Birkeland Bros, any identifying tag is long lost, natural white dyed by me in acid dyes. 1 skein = 350yds. Used about 250yds.

Needles:  Addi Lace Clicks, 4.5mm tips and 16” cord; Clover Takumi 7” bamboo dpns, 4.5mm.

Pattern:  Rachael’s ISBN Cabled Hot Water Bottle Cozy, free pattern by Yarnagogo, Rav link.

Mods:  Began with Judy’s Magic Cast-On, worked one more row of increases to 72 sts and using a different cable, the Elongated Chain Cable from Walker’s First Treasury. I also put the cable on both sides rather than just the front. Knit 6 repeats of cable patt plus 4 rows more before beg decs, added one more row of dec to 52 sts before ribbing.

Comments:  I should have kept the original number of stitches from the pattern rather than increasing because this yarn is thicker and the sweater is a little looser than I’d like. It’s totally usable anyway and is very nice on cold feet!

What else? Yesterday I went with my buddy Beryl (a gem and a jewel!) out to Cloverdale to Fibres West. Sorry I only took one very blurry photo so no pics. I always feel awkward about taking pictures at these things. The show is not large but it seemed pretty well attended this year especially considering that it was in a new venue yet again. We spent a very fun day meeting up with folks we don’t see often and others we just saw the night before at our guild meeting. I was very restrained and bought only 3 cones of superfine merino weaving yarn from Jane Stafford and 2 balls of Online sock yarn from a new-to-me yarn shop, Valley Yarn. There were lots and lots and LOTS of hand-dyed fibres and yarns – the most I’ve ever seen in one place. Personally I’m not willing to buy other people’s lovely but pricey stuff when I have plenty of stash to create my own but I know the indie-dyers are popular with a lot of people. However I’m beginning to wonder if the market is starting to over-saturate? I didn’t take any classes but I did enjoy a talk about local cashmere and received a little puff of the delicious stuff to play with. Probably enough for a couple of yards of yarn! More if I blend it with something else. It was a delightful day.

So sorry to all the folks who are still in the snow! Spring is truly here and we’ve got forsythia and daffodils out now. The sun is shining today and we’re heading off to the Farmer’s Market. I’ll try to wish some of the nice weather in your direction, minus the hail we’ve been having on and off for a few days. It could be a little warmer but I’m not going to quibble.

Monday, March 18, 2013

Craftsy Crazy

Craftsy.com

OK. I’m going to admit it. Craftsy is the best thing since the in-person workshop! I tested the waters recently with a free class on Short Rows with Carol Feller. This is definitely not your amateur YouTube offering! No, it’s professionally filmed and edited and you get over two hours of clear step-by-step instruction from Carol with her lovely soft Irish brogue and a PDF of the class notes. The only thing that separates this from the regular paid classes at Craftsy is that the discussions are student-led rather than instructor-led. There is still a lot of good information available so this proves that even the “mini-classes” are totally worth checking out.

Another good thing about Craftsy is their money-back guarantee. If you aren’t happy they really will refund you. The paid class prices may seem high, some as much as $50, but there are sales offered and deals can occasionally be accessed from instructors blogs or home pages. I think the price goes down after the class has been available for awhile as well. The interface is quite good. You really do need a high-speed internet access though. I occasionally had trouble with the HD video stalling but was able to stop, go away and come back to fix it. You can also reduce from HD to regular if that helps. It always remembers where you leave off and you can rewind, add video notes (aka “bookmarks”) and replay anything as many times as you want. Apparently your class access never expires but you may not get quick answers from your instructor if time has passed. I’ve also heard that earlier messages in the discussion area disappear after awhile, which I think is a bummer. I get a lot out of reading other people’s questions and the answers they receive. If they are deleted then I’m actually losing some good information. Boo. But those are the only problems that I’ve found. So far. I’ve accessed my classes from both my big desktop computer and from my netbook. Even on the little netbook it isn’t a bad experience if I use full-screen mode and my earphones. You can also use an iPad or iPhone but I’m not sure the screen is terribly useful on the latter if you really want to see what’s going on. Might be enough to jog your memory if you’ve already seen it and you just need a hint on what to do next.

So far I’m up to 5 classes signed up, 3 freebies and 2 that were paid for. You can also get workshops, which are more like “a-longs”, patterns, yarns and fabrics through Craftsy. In my Sew The Perfect Fit class with Lynda Maynard, I received an actual Vogue pattern (not a PDF) to use which took a really long time to get here, more than 6 weeks. And then I somehow ordered the smaller rather than the larger size. Whaaah. It’s always a tough call for me since I’m right on the cusp of the usual sizing split. Not that this dress is remotely my style at all anyhow. Understandably now I’m a little reluctant to go with something that needs delivery to Canada as always it’s a crap-shoot on timing and customs issues. I think I will stick to things with digital downloads instead.

And speaking of classes with materials included, I saw that Natalie Chanin is presenting her Hand-Embellishing Knit Fabric. As a fan of Alabama Chanin’s garments I’ve always had a craving to try this technique. However I already have 2 of her 3 books plus I found out I already own the Vogue jacket pattern included in the class. I also have all the other items that I need (fabric which of course needs to be dyed first, paint, thread, stencil material) to just DO IT! I’m inspired now. The jacket (Donna Karan’s V1263) looks much nicer “Chanin-ized” than the pattern envelope version does. Of course if I do the whole thing with hand-stitching, I’ll never finish so I plan to use a combination of hand- and machine-stitching, especially on long construction seams. Unfortunately as always, it’s gotta wait in the stew pot that is my version of a queue along with everything else. I’m hoping it bubbles up soon and doesn’t get lost in the sludge on the bottom!

Meanwhile, I’ve been slowly plodding through Lynda Maynard’s The Perfect Fit class without doing any of the actual work. But that’s ok. I’m learning a lot about her fitting approach which uses a similar method to the one in Sarah Veblen’s Perfect Fitting book. You sew a muslin and then chop into it to release tight areas and add fabric patches underneath to fill in the gaps and pin them in. Then you pin out fullness wherever you need to. Lynda works from the top down and the most import part of the demonstration to me was how she transfers the changes back to the paper pattern. It’s pretty intuitive, at least to me, and I found her methods methodical and clear. Unfortunately to really use this in your own sewing, you pretty much need a fit buddy – and I don’t have one. T-Man is always willing but doesn’t have a clue what to do and I don’t know anyone else locally with the time and the skill or even the desire to play fitting games with me. It can be done on my own but it takes a lot of putting on and taking off, trial and error, mirrors and possibly photos to see the back. I have 2 bodices I want to fit so I’ll be putting some of what I’ve (hopefully) learned to use very soon.

Interestingly both Lynda Maynard and Kenneth King recommend the same thick textbook on fit for their students, one I hadn’t heard about before. It was originally published in the 1980’s but this is the 2009 revised version:

FittingBook

I found a copy on Amazon.ca here but it’s nearly $100 so I’m going to have to save my sadly-now-defunct Canadian pennies for this one. The reviews are uniformly glowing and it seems to be what I need to round out my collection of books on fitting. I personally have so many fitting issues that it is not a simple task to make closely-fitted garments in non-stretch fabrics work properly on my body. Besides, I’m an unabashed bibliophile. Any excuse for another book!

So have you tried any online classes? Besides Craftsy there are offerings from PatternReview and CreativeBug and I’m sure others as well. What I don’t like about CreativeBug is that it’s more of a subscription-based service where you pay a monthly fee and get access to all classes. That kind of automatic-renewal thing bugs me especially if you aren’t interested in seeing everything but they seem to be offering more “a la carte” single classes recently. My initial impression is that more of their classes are beginner level or product-focussed rather than technique or skill based. PatternReview’s classes are all (of course) about sewing and the prices are on the higher end. They seem to have some excellent offerings though and the deal is similar to Craftsy’s. I don’t know if the quality of either of these are equal to Craftsy’s nor do I know anything about how well their interfaces function because I haven’t tried them. Let me know if you have!

Thursday, March 14, 2013

The Grass Has Riz

Wow! I’ve certainly been posting more frequently lately, haven’t I? Guess I’ve had something to say or something to show. Even if it’s boring old socks:

Speckled Socks

SpeckledSocks

For:  T-Man

Begun:  February 20, 2013
Completed:  March 12, 2013

Yarn:  Zitron Trekking XXL, 75% superwash wool/25% nylon, colour 112, dye lot 4777, 420M = 100g. Used 1 ball.

Needles:  Blackthorn carbon fibre dpns, 2mm.

Pattern:  Damselfly’s Plain Socks on 68sts, 9” before heel flaps, 8.25” before toe, dec to 24 sts, dog-ear reduction.

Comments:  Another pair of socks for T who is beginning to wear out his collection of hand knit socks since he won’t wear any commercially made socks anymore! I barely had time to snap a photo. They are already on his feet.

I have the best of intentions but I seem to be missing my sewing impulse right now. The next bra fabric is block fused to its lining. Things are all ready to go but I can’t get inspired to start. Every time I go up to the studio I’m called by the siren song of orange suri alpaca and sparkly beads. I have the Final Agave chart to do now before starting the edging. It’s exciting.

I figure that my projects are kind of like bubbles popping up out of the soup of my creative brain. No matter how hard I try to be organised and have a queue and a plan, I just can’t seem to follow my own directions! Something decides that it wants to get made and then it floats up to the top of my conscious where…pop! I notice it and it won’t leave me alone until I actually do it. I can have more than one of these Project Bubbles going at a time: simple TV or travel knitting, hard concentration knitting, sewing, a warp on the loom. Yeah, that last one hasn’t happened often recently – but I have plans. Another bubble is starting to surface.

So spring is sprunging out all over around here. My garlic is about 4” tall and T already has the veggie garden turned over to help compost the lushly green cover of fall rye. However, I haven’t started to plant any seeds yet. I’ve been burned the last couple of years with a very cold spring that left me with plants that needed to go into the garden but the garden wasn’t ready for the plants. Sometimes it’s better just to wait a little longer. But not too long! Besides it’s been dumping rain for the last few days and looks like the sogginess will continue for awhile. No hurry.

ETA: Or maybe there is a hurry after all! I just looked outside and the garlic is more like 6”+ tall. Yikes! When did that happen?

Tuesday, March 12, 2013

Where Did I Go Wrong?

Did I mention yet that the Not-Quite-Helena Skirt still was not done with giving me a hard time? I wore it a few times and it was fine except that the hem rolls up a little occasionally as I walk. I did forget to put thread chains linking the lining to the skirt which might have helped. Luckily I didn’t add them yet. Because that &%&%$# magenta lace that I used on the hem quickly looked like this:

SkirtRepair

Frayed and worn. And that’s after very little wear and only one gentle laundering. Argghh! So in anger I grabbed the thing and serged off the lace just under that nearest tuck. You remember the tucks? The lining turned out too long and rather than take off the lace and reapply it, I took a few tucks to shorten it. In hindsight I should have just hacked the whole thing off and turned up a machine-stitched hem. If I’d known the lace was crap I would have. And that’s not all the trouble I had either. In serging off the lace part of the hem while in a grump, I nicked the tuck with the blade! Whereupon I just threw up my hands and slapped some Fray-Chek on it. Then I made some quick-and-dirty thread chains at the seam allowances and called it a day. Now if anything else happens to this skirt it’s going to the Sally Ann toot-sweet. You have been warned, Skirt.

Meanwhile I finished the Speckled Socks (info to come) and started the new Blodgie Sweater. Knitting the Judy’s Magic Cast-On to begin was fun! It’s a bit loose though so I may have to start over again. It’s been too long since I’ve done this so my technique is a little rusty. I’m only a few rows into it so no real loss to begin again.

Also now that I’ve solved my chart reading difficulty with the Orange Aeolian Shawl, I’ve been hooked on working on this lace knitting project. Even the disruptions while placing all the gazillion beads hasn’t discouraged me. So what is it about lace that’s so fascinating? While you’re knitting it, the darn thing looks like an old shopping bag! The transformation into gorgeous doesn’t happen until you block it. But knitting lace is really fun – at least to me. And obviously to a few others as well or we wouldn’t have so many incredible examples to show off. Over 3,500 Aeolians on Ravelry so far!

While I was knitting away, I was listening to a new-to-me podcast: Thread Cult. (You can listen at Daughter Fish’s blog or get it from iTunes.) I really enjoyed the first couple of episodes which are in an interview format. The tone is intelligent and the subjects cover more than just sewing. I was hooked right at the first episode when the discussion was about natural dyes and growing them as well. Right up my alley since I’m scheduled to give a talk to my guild on this topic next month! Give it a listen and see what you think.

Speaking of web media, I recently heard about a new web-based contest sort of like Project Runway but for knitwear called The Fiber Factor. Besides the fact that it’s only open to residents of the US, you have to be able to take your own videos and to work quickly under pressure while being judged. Those criteria alone would leave out a huge number of designers, wouldn’t it? Maybe I’m just being an old lady here but it doesn’t interest me at all. I don’t know how you feel about these Idol-type things, but I personally think they are awful! Reduced to a personality contest and a panel of judges who can’t help but be subjective, the results would be suspect at best. In this case you wouldn’t even have professional people taking care of the presentation (camera, sound, light, makeup etc.). Ick. And no, I don’t watch any of the other challenge/reality shows either. I don’t enjoy contests in general but maybe that’s just me. As they say, YMMV. (BTW, how does that work in metric?)

Sunday, March 10, 2013

A Wee Rant And Other Things

RustSculpture

This staggered line of rusty pieced metal forms that sway slightly in the wind that we found at the edge of Seattle Center is both interesting to the eye and softens the view of a parking lot near the EMP Museum. I quite liked it and wish that Vancouver could invest in some better street art than the "poodle-on-a-stick” that was recently erected in my neighbourhood. Blech. What a gigantic waste of money that perhaps could have been used to improve public transit instead of cutting back. I know art is in the eye of the beholder and all. And yes, a little controversy is not a bad thing. But as far as I know, nobody really likes the giant poodle (except perhaps the misguided artist herself and whoever approved this commission) not even our mayor. I won’t post a photo here. If you want to see, just click on the link to the news story above. Or this slightly more positive one. Or this one. The comments are telling.

Mini-rant over. Moving right along. Here’s the FO that I promised:

Rosa Grey Tunic

RosaGreyTunic

For: me

Begun: February 9, 2013

Completed: February 26, 2013

Yarn: Dilthy-Wolle Linum, 50% linen/50% cotton, colour 1907 (dark grey), dyelot 102701, 80m = 50g, 8 balls.

Needles: Addi Lace Cliks, 5.5mm

Pattern: Rosa’s Sleeveless Cardi-Jumper by Emma Fassio. Free pattern from Ravelry here.

Mods: My gauge is off because my yarn is much finer so I needed to adjust sts & rows. Luckily this simple pattern is easy to fix. I began with 94sts, divided 32/1/13/1/32/1/13/1. Then I worked the increases to 22 rows before binding off for the sleeves. I added 3 st under each arm for a little more room in the bust. Knit straight down until row 67 and then began increases for the hem points, I just kept going with the increases until it was long enough for a tunic length at row 130. This makes really nice long points!

Comments: Swatched with the dark grey linen/cotton yarn from deep stash. It’s at least 20 years old and already been knit into 2 different garments and frogged both times! Third time lucky - a garment I can wear. I love this simple but funky tunic! It blocked out really nice and flat with hardly any rolling on the hems. I’ve already worn it to an event and got several positive comments.

Note that there are still 6 balls left of this yarn! Sigh.

Plus I have another FO to show off today:

Shibori Bag

ShiboriBag

Completed: March 9, 2013

ShiboriFabricMaterials: Kit from Kasuri Dyeworks. Includes piece of black and white shibori fabric, poly lining, 1 yard of kumihimo braid and instructions. Purchased at the Sewing & Stichery Expo, Puyallup, WA, Feb/Mar 2013.

Comments: For once I didn’t sit on this project for a decade! The finished bag is about 5.5” wide x 7.5” long. I didn’t follow the instructions exactly because the piece of shibori was not quite the right size and I didn’t want to trim it. The lining piece was somewhat shorter and wider so I trimmed a piece off to fit the width and after sewing the lining and the bag together I folded down the shibori inside at the top until the lining reached the bottom of the bag. This meant that the slots that I left for the ties were somewhat closer to the top of the bag than I would have preferred and the bag is a little longer proportionally. I think it worked out OK anyway and as a bonus I didn’t lose too much of the floral pattern. I was careful when pressing not to flatten the shibori texture too much. Now to find something to put in it!

Meanwhile I’ve been knitting away on my Orange Aeolian Shawl. So far I’ve done the Set-Up chart, the Yucca chart 6 times, the Transition chart and am partway into the Agave chart. Boy, did that last chart give me trouble! I knit the first row over and over without it coming out correctly. I checked the web for errata or difficulties. Nobody reported anything. I resorted to re-charting the last 2 rows of the transition chart and the first row of the agave chart to see how they corresponded. Looked all right. But I was missing something in the knitting of it. I had extra stitches that wouldn’t resolve. Out with the pattern sheets and…then I caught sight of the Symbol Key. There was my problem. I was reading a thick diagonal line as k2tog instead of k3tog. The same with the opposite slant and ssk instead of sssk. Urp. The symbols were too much alike and I was too tired to see the difference. This Knitty pattern by Elizabeth Freeman is beautifully written with lots of explanation and detail. The mistake was all mine and I paid for it with a lot of frogging and frustration! But I’m over that now and on my way again.

I haven’t started the new Red Blodgie’s Sweater yet but I’m nearly at the toes on both of the Speckled Socks for T-Man. I’ve also block-fused the Bravo Bella bra fabric together with the lining using Wonder-Under. This worked well for me in the ivory sport mesh bra so I’m hoping it takes some of the extreme stretchiness out of this ivory shiny/matte vaguely animal-print fabric. No wonder it’s so hard to make bras that fit when the fabrics are all so completely different! There’s enough here for at least 2 or 3 bras if I can get other elastics and findings for them. We’ll see how it goes after this first one.

BTW, I found out the 30-foot-high rusty installation is called “Grass Blades” by John Fleming (2002). More info (and better photos than mine) here.

RustSculpture2

Friday, March 08, 2013

Undies Revealed

Yesterday I promised some FOs so here’s the first instalment. I know some people think that making one’s underthings is kind of silly but I don’t. As the old body further ages it not only is hard to find items in the right size but it gets harder to find the types of underwear that I like. Definitely comfort rates over style for me. I have absolutely no need (or interest in) sexy lingerie. I mean, just who am I trying to please? My husband of nearly 43 years is already attracted! So that just leaves my own aesthetics and my personal taste tends to simple clean lines, no frou-frou laces or ruffles, and just about any colours besides boring white and beige. I also like good coverage so that means no thongs, tangas or g-strings. (Ewww…) And boyshorts do not work on my body shape. I’ve tried. One pair. Big fail.

So you might remember that I got a free bolt of white cotton interlock from my ex-neighbour when she moved out. I washed a small piece and scrunch-dyed it in Procion MX as a test piece. There was just enough for a pair of panties:

CloudsUndies

I call these “Clouds”. Yes, they are indeed Granny Panties! After all I AM a granny. Heh. I used matching blue plush-back elastics from Dressew and they are very nice. This fabric is comfy and soft with just a little give to it. There’s no lycra content so it wouldn’t keep its shape for something like tights but panties are fine. The pattern is the one where I traced a pair of silk panties that I liked. However I think I need to modify the pattern just a little to make them perfect. The front leg needs to be cut upward about an inch higher to follow my contour better. Next pair. And there will be more of these as soon as I dye some more of this fabric and buy some more elastics. It would make sense to buy enough for several pairs instead of one at a time, no? Plus I finally figured out the correct amount I need so as to waste the least. For 3 pairs I can use 2 metres of waistband elastic and 3 metres of leg elastic. I’m really most fond of the plush-back elastics here but maybe fold-over will work too. I have lots of the latter in the stash now.

And that’s not all! I finally finished the Black Bra:

BlackBra

The materials are all from the original kit I got last year from Bra-maker’s Supply. The pattern is the last version I drafted with a 4-piece cup including power bar. It’s nearly perfect. Unfortunately though the cups are a smidgen tight because this Duoplex fabric has absolutely no stretch whatsoever! The last bra that I made (the ivory one) when I was testing my first self-drafted pattern was made from slightly stretchy sport fabric doubled in the lower cup and front band and single in the top cup and it fits better. Obviously I need to allow in the pattern for the really super-non-stretchy stuff! I even had to use the shorter wires because the channels turned out short as well but they worked OK. It’s quite wearable but just doesn’t cover as high as I’d like at the side cup area. I’m just aiming for perfection and this bra isn’t quite there yet. Hopefully the next one will be just right.

Anyhow I now have 4 wearable bras in various states of close-to-perfection but of course I’m not done with experimenting. I still have the remains of another kit like the black one but in brown, plus the ivory Bravo Bella kit I showed you yesterday. Not to mention other fabrics that could be suitable including lots of powernet. I just have to order a few more items from BMS to supplement what I’ve already got in the stash. Remember a single custom bra can cost $250! So far I don’t think I’ve spent quite that much on everything, including the two videos by Beverly Johnson which were really helpful. I’ve learned a lot already – I can tell because each bra gets easier to make. Eventually I should have it down to a quick production line. That’s the plan anyway.

I also have to remember that my poor old Pfaffy sewing machine doesn’t like to stitch triple-zig-zag in the heat of summer. She kind of loses control when the foot pedal overheats and roars off on me! Which means I need to have a good supply of proper-fitting bras made by the time summer comes and it gets too hot in my studio. Right now she’s working just fine. Touch wood…

There’s one more item I haven’t shown off yet but I think I’ll wait for the next post. It didn’t quite fit here because it’s not underwear. More anon.

Thursday, March 07, 2013

Sew Expo Loot

I have a whole bunch of FOs to share with you but I think they will have to wait until subsequent post(s). While it’s fresh in my mind, I’d like first to show what I bought on our mini-vacay. There’s not that much but I don’t have a lot of time today. I’m off to a Spectrum meeting later and after that my Guild’s annual memorial lecture. So without further ado:

That’s fusible stay tape in white/bias and black/straight, a really big cone of white cotton thread (for sewing up items before dyeing), and fold-over elastics (2 dyeable and 1 black). (Links take you to the companies I purchased from.) I also got:

BraKit

a bra kit in ivory from Bravo Bella. I want to say that I got fabulous service from this company. Monica and her staff were very helpful and she took quite awhile to get the size of my underwires correct. She matched them to my bra over my clothes! I was glad I was wearing one that I made, though not my best bra. When I checked out the supplies in the kit I was surprised that there were no rings and sliders included and only a very short piece of strap elastic. A lot of online research later, I came to the conclusion that Monica’s bras are made in a similar way to Anne St Clair’s. (Thanks to Audrey for the clue!) She considers that a custom bra can be permanently adjusted for strap length and all that is needed is a little piece of elastic at the back where each strap attaches to the bra back. Unfortunately my back design calls for longer pieces (at least 9” each) and I personally like to be able to adjust tighter as the elastic stretches out so luckily I have matching strap elastic and a set of white sliders and rings that will substitute. The fashion fabric is quite stretchy so I was glad a piece of lining tricot was included for more support. Other oddments are a piece of fusible interfacing which is meant to stabilize the straps and a short piece of twill tape for the centre front which I probably won’t use since there’s not really enough room in the front of my bridge for it.

Interesting aside, I compared the quality of the plush-back elastics from three sources: Bravo Bella, Bra-maker’s Supply and my local shop, Dressew. Ahem. I hate to say it but Dressew has the best stuff even though it is only available in a load of odd (but lovely) colours and no black or white. It’s also cheapest, most being only $.25 per metre. Go figure.

Back to the shopping. In the Kasuri Dyeworks booth (no shop link available) I got this little piece of shibori:

ShiboriFabric

This is a kit to make a small drawstring bag. There’s also a piece of printed silk for lining and a kumihimo braid for the drawstrings plus directions. Of course I recognised the braid as good old yatsu kongo gumi. (You might have to bigify to see it.) I plan to actually make up the bag though the seams will intersect in the floral pattern somewhat. However I would prefer to use it rather than keep it in a drawer somewhere.

What else? Oh yeah. My shoes.

ZieraShoes

When I got my last pair of shoes which are khaki/taupe I was really looking for grey! These are a nice medium-grey nubuck with bronzy-metallic and a bit of thread stitching. They’re made by Ziera from New Zealand and they are so comfy. They’ve already passed the Walking 8 Kilometres Test on the first wearing! Success.

Yes, I really envy those who can wear hot shoes with heels and pointy toes and all. My feet are picky! But considering how much I walk and how well my feet cooperate, they are totally worth spoiling with comfortable and expensive shoes. After all, I can make all my other clothes – but not my shoes!

Monday, March 04, 2013

Pre-Spring Break

We’re back! Did you even notice I was gone? We packed up the old VW van and took off south last Wednesday morning. It took a half-hour to get through the border which is kind of average but with no hassles. The weather started out quite nice but clouded over with a splash of rain by the time we got to our first stop, the Safeway in Mt. Vernon for groceries. Then we continued south to Seattle and our second stop:

Chihuly1

The Chihuly Garden and Glass museum at Seattle Center. It was pretty incredible! Inside are rooms like this:

Chihuly2

To give you some scale, those “flower stalks” are considerably taller than I am. And outside are gardens like this:

Chihuly3

Even the real plants are coordinated in colours with the glass. We were lucky that it stopped raining long enough for us to enjoy this part without getting soaked.

Chihuly4

Can you see us in this big glass ball? That’s the reflection of the Space Needle to the left and the big yellow “flower” from my first photo to the right. I really wanted to take all the beautiful balls home but they wouldn’t let me. Darn.

Among the many cool things in Seattle Centre there’s the EMP Museum (formerly the Experience Music Project and the Science Fiction Museum and Hall of Fame). This really unique building was designed by Frank Gehry:

EMPbuilding

Made of colourful sheet metal it’s a sculpture all by itself and we walked all the way around it for different perspectives. We resisted going in (missing Captain Kirk’s original command chair) and we didn’t take the elevator to the top of the Space Needle either. It started to rain again and we had much farther to go before we called it a day.

So we continued to head south to Tacoma where we hung a left into the countryside towards Puyallup (yes, properly pronounced “pew-AL-up”), a cute little farming town that is most famous for two things: the Puyallup Fair and the Sewing and Stitchery Expo. No need to guess which one I was there to see! We had a reservation and stayed overnight in the area of the fairgrounds set aside for RV camping. It consisted of a pot-holed gravel driveway with soggy grass and mud areas to park on, no washroom amenities, but with the blessed luxury of a plug-in for our little heater. It rained buckets that night too so we were glad of the power to dry us out in the morning.

Thursday we headed over to park closer to the main entry for the sewing show. I didn’t go to any of the seminars but ended up dragging poor T-Man all around every single booth in two packed buildings! After 4 hours it all became one big blur:

SewingShow

And apparently Thursday is the quiet day! I didn’t end up buying much. I think it was a lesson in “enough” – as in “I have enough stuff to keep me busy making things for a good long time without buying anything else!” I did get a few items and I’ll say more about them in the next post. Suffice it to say that I got out of there for less than $100. Amazing I know. Sadly I managed to miss the Tilton fashion show because I couldn’t find out where it was being held and there was no information in the show guide. However I did see Marcy and quite a few of the garments in person in their booth later. She was busy so I just ogled the yummy fabrics but didn’t buy anything there.

However I did buy a little piece of Japanese shibori fabric from these lovely people:

KasuriDyeworks

Kasuri Dyeworks from Wyoming. I spent quite a while discussing stencil cutting (they had some lovely traditional ones but way out of my price range), kasuri, shibori, weaving, and indigo dyeing. I think they were fascinated that I not only knew the techniques used in the kimono yardages they carried but had actually experienced them myself. Hey, if it has anything to do with textiles, I’ve tried it! At least once.

After we escaped the sewing show and had lunch in the van, we headed north again up to the Mukilteo ferry over to Whidbey Island. We amazingly managed to snag the last campsite with electric power at Fort Casey, save for the handicapped site. It was pretty windy the whole 3 days we stayed there and we raised and lowered the pop-top on the van constantly. The gusts made the canvas “fwoomph” rather loudly and annoyingly! The nice thing about Fort Casey is that we could easily hop the Keystone Ferry over to Port Townsend, so on Friday that’s what we did. We spent a couple of hours there and had lunch. I also bought some cute new shoes at the Clothes Horse. I don’t have a photo yet so details later.

We had fun on the ferry on the way back. People leave puzzles on some of the tables to amuse the passengers so we worked on a rather difficult one for the whole half-hour or so of the trip back to Whidbey Is. Of course we didn’t get anywhere near to finishing it! Not even the lacy border. The wind and waves right at the mouth of the Keystone dock continued to give the ferry a bit of a wild ride in on Saturday and Sunday as well. Here’s the Kennewick on her way out:

Kennewick

You can’t tell but the wind was blowing hard enough up on the bluff for us to lean on it! Anyway it was nice to see the sun after it rained most of the day on Saturday and even though it was still shining on Sunday we decided to head home. We were out of tank water, books, food and ice and both of us needed a hot shower badly! So we took the scenic tour home by way of La Conner and then the Farm to Market Road through the picturesque little towns of Edison and Bow and on to the curvy Chuckanut Drive into Bellingham. The border was pretty quiet and it only took 15 minutes to get through. And here we are – home again.

For a camping trip in winter we had a really enjoyable time!