Friday, May 31, 2013

Stormy Dress Progress

T-Man is off to Lee Valley Tools playing with wood and learning how to make a cigar box guitar. (Can’t wait to hear how it sounds!) Yesterday while he was gone I finally felt well enough to get on with sewing Marcy Tilton’s V8876 dress:

V8876 MarcyTilton

Otherwise known as my Stormy Dress, this has been a more difficult process than than I thought it would be. Even with all my fitting adjustments to the pattern before cutting it out, it still needed a lot of further tweaking in the front bodice and shoulder/yoke areas. There was still too much cloth above the bust but luckily with so many seams to play with I was able to nibble bits off until it hung better. I still have a bit of work to do on the shoulder which is not quite right yet. I think I’m going to have to be resolved that the shoulder seam will not line up with my actual shoulder. Nothing new there really – it happens all the time! I don’t think this messing about will affect the little cap sleeves. I hope. Unfortunately I’m not so sure about the collar. I may have to shorten it or deepen the neckline seam a little, not sure which will work best.

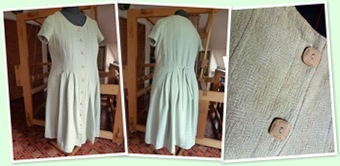
Here’s what it looks like on Debbie so far:

StormyDress_fitting

Yesterday I was going back and forth between Debbie and my own body to try it on about a jillion times. Here the yokes are only pinned on and I haven’t actually permanently finished any seam allowances just yet. And I just realised that I stupidly forgot to put in the inseam pockets in my excitement to stitch up all the seams to try it on. Argh. I’ll tell you I’ve been making intense use of my un-picker on this project! At the same time I’ve also been trying to record any changes back to the pattern because I want to use it again for a vest version. I have no desire to do all this fitting twice. This is hard!

So while I’ve been thoroughly messing about with the 14-million pattern pieces for this dress, I was thinking about whether I should have traced off the whole darn thing first. For good or ill, I opted to only trace the yokes and the sides (front and back) just from the waist-level adjustment line up to the top. This was kind of a compromise. The drawback of working directly with the tissue is that if I mess up the pattern too much I won’t be able to recreate the original in order to start again. It also means that it’s no good to use for anyone else except me as I am right now. On the other hand, there are too many pieces to make it an easy task to trace them all. This is an advantage of digital patterns where you can just reprint if you need to. I mean really if you think about it tissue actually kind of sucks as a pattern medium. Thin, wrinkly, tears easily, hard to cut around without cutting into. The only real advantage is easy storage. Did you know that old Mr. Butterick came up with using tissue so it wouldn’t cost so much to mail his patterns? Not because it was the ideal pattern paper. Now you know.

Difficulties aside, I’m pretty proud of how far I’ve come in my skills. {pats self on back} None of this would have been possible even a year ago. I wouldn’t have a clue how to solve the multiple fitting problems and probably would have given up in disgust. I reiterate that this is definitely not an EASY pattern. Pattern envelopes lie! Who knew?

However I am grateful to both Marcy Tilton and her sister, Katherine, for their very cool, innovative, comfortable and versatile garment designs. They are very popular with the sewers who prefer a more artsy individual look but not totally out-there. Significantly they are also women of a “certain age” so there is some consideration taken of what works on more mature body shapes. Some others with a similar aesthetic are Sandra Betzina, Sewing Workshop and the late lamented Au Bonheur des Petites Mains. I’m sure there are more out there too. I really think there is a viable niche market for this type of sewing pattern. Hopefully their sales records back me up.

What I’m hoping though is that as my skills at patternmaking and fitting further improve, I’ll be able to break away from commercial patterns. (At least from buying new ones, most of which I never use. Oops.) I’ve already been pleased with several of my own efforts in this direction. Currently I’m working with relatively simple shapes so something like my current dress project is still pretty far beyond my drafting skills. It’s a laudable goal though. Wouldn’t it be cool to imagine a garment, any garment, and recreate it in your own size?

OK, back to the studio, damselfly! Wait! Lunch first.

Wednesday, May 29, 2013

Sartorial Choices

What does a damselfly do on yet another rainy day whilst attempting to recuperate from The Cold Bug? Sew? Maybe tomorrow. Right now I’m in a musing mood. Peter (of Male Pattern Boldness) posited an interesting question on whether or not we should dress better. I acknowledge that people tend to judge other people by their clothes but that habit can be so superficial and occasionally downright nasty. Your opinion is not required unless specifically requested! Personally I say wear whatever you like…but choose it deliberately. Don’t just pick up the first things you find on the floor. Oh wait. That would currently be me. Vintage fleece sweatshirt, old T-shirt, loose stretchy pants that I’ve been wearing for days and are really overdue for the laundry. My excuse is that I’m lazing about in bed not feeling well. And most importantly, I’m not sharing my outfit with anyone else, apart from T-Man. And he doesn’t much care.

Anyway as you might already know, I grew up in the 1950’s and ‘60’s. This was the era of wearing a dress, a hat and white gloves just to go downtown. I swear, nobody these days believes me but it’s true. Hey, sometimes it’s fun to dress up! I wore a proper uniform to private school and even when I got into public school in grade 10 girls had to wear skirts. The effect of all these strictures on me was to fuel my desire to wear whatever I darn well please! I tend to be somewhat perverse like that. (Must be my Scorpio birth sign.) I also started sewing as a young teenager specifically so I could have unique clothes that you couldn’t buy. Although I’ve always been able to justify buying fabrics! (Also books, magazines, yarns, thread, tools, fibres…)

Which brings me to the other recent hot topic of the sewing blogosphere: pattern companies and their lack of response to what we in the sewing world really desire. A fun discussion and I was directed in one of the comments to a very interesting master’s thesis by Debra Lee McLendon entitled An Investigation of the Sizing, Grading, and Fit of Commercial Sewing Patterns. It’s quite an eye-opener. Do read it if you are at all curious about fitting issues. One good quote:

This information could be used to increase customer satisfaction by producing better fitting patterns that contain more accurate information to aid sewers in achieving improved fit. This insight can also be used to increase sales by developing specialized patterns for new target markets.

Are you listening Big 4, Burda et al? Wakey-wakey, people! Why can’t you at least attempt to cater to actual women’s shapes instead of a size 10 fit model? (The latter is possibly nearly as rare as the unicorn.) Of course even revising their basic blocks and numbering systems likely wouldn’t help me that much with my own fitting. Not only am I not an hourglass body shape (more like a rapidly aging diamond/oval), I also have my own style ideas that do not necessarily follow the trends. However, it would really help the whole home-sewing industry if more people had more immediate success – preferably without having to learn the equivalent of a college degree in Textile Science to get the desired results. I’d put money on the fact that quilting is so popular because quilts don’t have to fit a body! Ditto for home-dec, bags and purses. Yes?

Unfortunately they’re still working with really old and inaccurate data. Big 4 pattern sizing hasn’t changed in over 40 years! I know human bodies are as diverse as snowflakes – only even more 3-dimensional - but they’ve had accurate digital body mapping for at least a decade or more. It should be relatively easy to come up with more representative sizing system. So you’d think things would be improving by now, both in patterns and in RTW. Just where exactly is the block located? Or are there more than one?

Oh, and while I’m at it – how about the problem of pattern sewing instructions? Why do they continue to have those awful fold-out newsprint sheets with really bad drawings? Why??? They over-explain something basic and gloss over the tricky stuff too. In contrast, I recently downloaded a digital pattern from a brand-new indie company, Thread Theory, the Newcastle Cardigan. (More on the company itself in a moment.) The pattern came in an email as a link to a download for a zip file. Included in the file were a PDF for the usual pages to be printed and stuck together and a separate PDF of the pattern instructions. These are fabulous! Lots of information, two-columns with written instructions on one side and colour illustrations and photographs on the other. Eleven pages of good-sized type, nicely presented. I have to admit I can’t read it with the eyes of a total newbie because I’m not one, but it seems pretty thorough. I’m starting to become very fond of the independents. They are free to innovate.

So what about Thread Theory? They are a husband and wife team based across the Salish Sea in beautiful Victoria, BC. And like the even-more-local Sewaholic, the pattern names are so evocative for me. Newcastle is a small island and provincial marine park just off the Vancouver Island city of Nanaimo where T’s grandfather once hauled coal and where we sailed years ago when we had our little boat and hiked around the whole island. I’ll let you go check out the above link for their whole story but the very cool thing is they have decided to focus on men’s garment patterns! Nice functional ones that a guy might actually want to wear. How novel is that? T-Man saw the first release, the cardigan, and immediately was intrigued. They will be releasing the rest of the 4-piece collection this year and are already planning a second year’s collection. The price is very reasonable and I don’t really mind printing my own pattern. I kind of like the immediate gratification of not having to wait for the post. We have to go fabric shopping now though since there’s currently nothing in the stash that’s appropriate. Awww…

But first I have to shake this bug. It’s cramping my style.

Tuesday, May 28, 2013

Easy-Peasy. Or Not.

It’s dumping rain on and off today and I’m also feeling under the weather. I think the Littlest Grandbeastie shared her sniffles with me. Boo. After playing with her on Thursday I came down with a sore throat on Sunday morning. Sounds about right for the incubation period. Didn’t help that I spent Saturday at the Celebration of Life for yet another member of my Spectrum Study Group. That’s 2 gone out of 8 in a very short time. Is it something in the water? (Sorry. I’m prone to gallows humour at times.) If I sound a bit bleh, it’s because that’s just how I feel.

So instead I’ve been sewing Marcy Tilton’s V8876 dress, View A with the button front and cap sleeves, in my hand-dyed rayon/linen and I think it’s going to be a very interesting garment. I started with a size 12 and morphed to a 14 between the underarm and waist. Good thing I never go by the measurements on the envelope or this thing would be huge! It took ages to figure out what other fitting changes to make to this so-called Easy pattern. (Vogue, give your heads a shake! Not. Easy. At. All.) As always the shoulders were way too wide and the armholes too deep, even after adjusting for my sloping shoulders by 3/8”. I took about 5/8” out of the shoulder width and added 1/2” of height to the armscye under the arm at the side seam which brings it to a hopefully more acceptable size. I hate gapping armholes. I’m still trying to decide whether it’s easier or harder to adjust with so many pieces to deal with! Gives me lots of seams to consider.

The natural beige fabric had been scrunch-dyed in a bucket so the patterning and colours varied a lot from side to side and one end to the other. I only used black Procion MX and got various shades of charcoal, navy, grey and blue. I’m calling it Stormy! I cut the pattern out without paying much attention to where colours and shapes ended up but then spent ages sorting the various pieces for a more-or-less balanced look. The fabric is the same plain weave on both sides (it was a white rayon warp with natural linen weft before I dyed it) and I was able to flip and turn the pieces several different ways. Then I marked the top side of each one with a fabric crayon so I wouldn’t get mixed up. Oops. I meant to take a photo but forgot in my hurry to get to the sewing!

Other changes to the pattern included interfacing the front pieces where the buttonholes and buttons will go. It’s a wee bit stiffer than I’d like but without the interfacing this fabric is rather drapey and I thought that stabilizing would be helpful. I also doubled the front yokes as for the back. Why not finish it nicely? They’re only tiny pieces of fabric. Lots of people have sewn the yoke with the burrito method and I can still do that while including the front yokes. I also started following the instructions for basting the centre front pieces together with their facings and then treating them as one to attach to the middle front section but now I have to pick it out. I decided to fold the facing seam allowance under and slip-stitch it to finish that edge off better. I figure if I have to slip-stitch the hem facing on anyway, why not do this part too? I don’t mind. Sewing is no fun if it’s rushed.

Besides, sewing a garment is not nearly as time-consuming as knitting one! I finally have my latest sweater to show you:

Not-Ruby Twos-day Cardi

NotRuby TwosDay Cardi

Begun:  April 30, 2013
Completed:  May 20, 2013

Yarn:  Newton’s Yarn Country Happy Feet, superwash merino sock yarn, turquoise-based multi-colour hand-painted style, 1800 ypp, used just under 600 m, only 2 m left!

Needles:  Addi Lace circs, 3.25 mm and 3.75 mm. Clover Takumi dpns, 3.75 mm and 3.5 mm.

Buttons:  Mother-of-pearl buttons from Dressew.

Pattern:  Ruby Tuesday Cardi, free pattern by Ewa Durasiewicz.

NotRuby TwosDay detMods:  Used larger needles than pattern and increased a couple more times at each side of the yoke before dividing for the sleeves and body. CO 17 sts under each arm.

Comments:  Trying again! This version uses 1/1 ribbing which I started later on the bottom. I used 3.5 mm dpns for the sleeve ribbing and knit until I had just enough yarn left to bind off. This resulted in sleeves that are just a little shorter than the ones on my yellow sweater. I only had a very limited amount of yarn but ended up with quite a wearable sweater. It goes with quite a few things in my wardrobe but I have to watch the sleeves because the cardi’s sleeves are quite snug. Best over a sleeveless layer.

I have now used up all the Newton’s Yarn Country skeins that I bought in Spokane 4 years ago at ANWG (Association of Northwest Weavers’ Guilds biennial conference). Hopefully I can get some more next month at this year’s ANWG in Bellingham, WA. I made an awful lot of projects with this stuff - out of my last 4 skeins I got ten garments and accessories! I like that it comes in very large variable-weight skeins, usually nearly a pound each. I also like that it is much more irregularly dyed than usual for a commercial yarn, more like hand-painted and in shorter blips of colour that don’t really pool much. Sock yarn is one of the few yarns I can justify purchasing for the stash. I actually use it up.

Thursday, May 23, 2013

Celadon Dress and Other Goodies

Hey, I’ve been busy with the camera so we finally have some images. Yay!

Celadon Dress

Begun:  sometime ca 1997
Completed:  May 2013

Fabric:  my own handwoven fabric, cotton/rayon yarn, celadon green, weave structure: 8-shaft advancing twill, sett 36 epi, 30” wide, 8 yard warp length (some of this is waste and some was used for sample swap). Woven in 1997.

Pattern:  McCall’s 7974, from 1995 (OOP), button-front dress with front and back bodice pleats, scoop neck, several sleeve options.

M7974Notions: Small amount of unbleached muslin for facings, both straight and bias strips. 10 buttons, my own handmade polymer clay. Polyester seam binding, cream. Polyester serger and sewing threads.

Mods:  I removed the facings from the fronts and neckline and re-cut the shoulders and armholes using my personal sloper. I couldn’t find any more of the fabric (not that I looked too hard!) so I chopped off 8” from the hem and cut short sleeves and 2 ties for the back from the remainder. I replaced the front facings with muslin strips and the neck facing with a folded bias strip. These were topstitched into place. I tried the dress on many times in order to continue the pleats down to a more pleasing level just above my waist and tighten them into a more shaped fit. I also took the side seams in a little at the underarm and waist area. The back still looked a little too loose so I added ties to the innermost pair of back pleats.

Comments:  This dress was a very long time in the making! The poor thing sat in my closet for 16 years languishing after I had partially finished it, tried it on, and realised it was lumpy and terribly unflattering. At least now I know more about how to make things fit me better. I’m pretty happy with the results. I did have a little trouble with the unforgiving polyester seam binding that I used for the hems. (Remind me to stick with rayon binding or just overlock the darn things in future.)

CeladonDress_hanging I was a little concerned when I washed the finished dress that the buttons were fragile so I was careful to do it on the gentle cycle. Unfortunately that left the fabric very wet and it took forever to dry! I hung it up outdoors on the bean net in the sunshine to hurry it up. Happily it dried in time to wear it and most of the red dressmaker’s carbon marks that had been there for 16 years came out.

After wearing this dress once I noticed that there as been some slippage of weaving threads at the pleats where it’s a bit tighter at the waist. The thicker threads of handwoven fabric and the slippery nature of rayon is the problem. They don’t grip each other tightly or felt slightly to hold together. I will have to iron on some stabilizer on the back to prevent further damage. I really would like to finally get some wear out of this dress now that it’s been resurrected from the Dark Closet of Doom!

Right after the dress I cut out and sewed the next project. Instead of lurking about in the stash for years, this fabric barely had time to land on my cutting table after bringing it home from the shop and immediately washing and drying it.

Mint Pants and Capris

MintPants

Completed:  May 2013

Fabric:  French terry, fibre content not available, probably cotton/lycra, light sage green. 54” wide, 2 metres long from Dressew.

Notions:  3/4” waistband elastic, 6 mother-of-pearl buttons from Granny’s button collection (for capris), polyester and serger and sewing threads.

Pattern:  my own copy of a favourite pair of yoga pants.

MintCapris_cuffs Comments:  These are pretty much identical to the Chocolate Cake Pants and Capris that I made earlier. The hem on the capris is 1/2” less deep due to a slight shortage in length of fabric. I wanted to note that I used the 4-thread safety stitch and the 1.5 differential feed on my serger to avoid stretching the seams out. This fabric is very stretchy in both directions. The terry loops are on the inside and the feel is really quite soft but substantial. The light green colour goes with a lot of pieces in my closet and is especially nice for warmer weather. I also like being able to use up some of the odd buttons from the stash. Two more bottoms for mixing and matching!

While I still had the green thread in the sewing machine I dragged out this very elderly dress in black and green gingham print:

FadedGreenDress

I’ve had it forever and it’s very faded and nearly completely worn out but I just can’t bring myself to chuck it. The problem was the bust is ummm…. a little snug on me. I decided to pop in a gusset on each side to give me a smidgen more room and since the Mint Pants fabric is a similar colour, I used its stretchiness to advantage:

FadedGreenDress_gusset

It looks a bit funky but so does the whole dress! It’ll probably wear out completely in the next wash or two so no big deal. I plan to use this pattern with an added FBA to make another dress very soon. This mid-calf length style is so cool and comfy in summer. Obviously I love it enough to have hung on to this beast for so long. 

But that’s not the next project on the list. Right now I’m working on Marcy Tilton’s V8876 View A with the cap sleeves in hand-dyed linen/rayon. Goodness, this is not a simple dress. There are 14 pattern pieces for this version! And I have to make my usual shoulder and armhole adjustments. At least I’m getting much better at fitting as time goes on and I get more experience. My results are much more satisfactory now than they used to be in the Bad Old Days of humongous baggy clothes. See the Celedon Dress above for proof!

Hey! I have curves and I know where they are. At least until life and gravity plays some more tricks on this old body.

So there’s another FO too but I’ll save that one for later.

Wednesday, May 22, 2013

Pictureless Post

Gee, how does time get away from me so quickly? We had the Biggest Grandbeasties overnight last weekend and then I spent several productive days out in the garden. Clearing and weeding and hoeing. I’m harvesting a bucketful of salad greens every couple of days just by picking a leaf or two at a time. Yum! The asparagus is slowing down but we’ve had quite a few meals with their deliciousness included. The weather has been very conducive to growth so far and everything is doing very well. Too bad this is a summer of reduced planting because we’re planning a long vacation. Ya wins some and ya loses some.

Yesterday it rained so I got the two pairs of Mint Pants: Long & Short nearly finished. Should have them done today. They’re nearly identical to the Chocolate Cake Pants, just a few tweaks here and there. For some reason I was a little short on fabric this time so my capri version has slightly reduced hem allowance. Like anyone would notice! I’m including the button detail on the cuffs again because I liked that so much from the chocolate pair. I so wish there was more of this French terry in Dressew. I’d especially like a charcoal gray version but couldn’t find any. Only a darker green which I probably should have bought even though it had a faded line on the fold. It’s probably all gone now. There were only about 2 metres left on the bolt anyhow. Oh well. Maybe I’ll dye some of the remaining magenta interlock and have a tie-dyed pair! Printed and brightly coloured pants seem all the rage at the moment, don’t they? Would it be too big of a shock for me to go all trendy?

I know I haven’t showed you my handwoven dress refashion yet either. I was waiting to get a photo of me wearing it but when I wasn’t up to my elbows in dirt, it was too dark. Yeah, I’m not good at pictures of me. I can’t quite get them right. Maybe today.

I also finished the Not-Ruby Twos-day sweater. It’s very similar to the first Not-Ruby Not-Tuesday Cardi and I managed to get sleeves that come just past the elbows or can be turned up above that point. Since I didn’t think I had enough yarn for this sweater I consider that a success. I had about 2 metres of yarn left! Yes, this is another thing that needs photographing. Sigh.

In other random news, we are currently living with construction of a new house going on directly across the street. They’re putting in the forms for the foundation and the sound of the compressor is soooo annoying! There are several nearby building sites right now and I’m getting pretty tired of the trucks and the hammering. The only good part is that we’ve met our new neighbours who will be moving in and they are very nice including a pair of primary-school-aged kids.

And that’s about it for now. Sorry about the lack of pictures in this post. Come back soon, y’hear?

Friday, May 17, 2013

Everything Old Is New Again

It’s been a bit quiet around here mostly because I’ve been busy sewing. And walking. A lot. The sewing was the refashioning of the handwoven dress from 1997 which I promise to blog shortly. (I need one more photo first.) I did finish it on time and wore it last evening along with my Orange Aeolian Shawl to my weavers’ guild meeting where it was very well received. It wasn’t even the oldest garment there! It had stiff competition from a blouse that was over 20 years old and a skirt and top that were woven in 1987. Plus lots of lovely new garments and accessories. It was a really fun social evening with a potluck and door prizes. No need to ask. I didn’t win anything.

Besides the usual grocery runs, the walking included another jaunt downtown to my beloved Dressew. I needed some buttons for my latest not-quite-finished cardi and some thread. Of course that wasn’t all I bought! I’d been ignoring the bins of cotton yarn for the last few trips but this time I bought two colours. You know – before they run out completely. The stuff is dirt cheap at only $4.99 per 1+kilo cone.

YarnCones

They referred to it as crochet thread but in my world it’s also great weaving yarn for placemats and tea towels. 10/3 cotton. The label also says it’s mercerised but it doesn’t seem very shiny. It doesn’t really matter. I need some new table linens in the worst way. But first I have to stop sewing new clothes and actually wind a warp. Erm…

I also got some fabric:

FrenchTerryGreen

This is the same French terry stuff as my chocolate pants but in mint green instead. (Oh yum – mint chocolates!) It’s a lovely mid-weight and is stretchy but recovers well. Anyway it goes with lots of pieces in my wardrobe and is a lighter colour for a more summery look. I plan to make a similar pair of long and capri lengths, just like I did with the chocolate version. The fabric is already washed, dried and on my cutting table ready to go.

To top things off nicely, my pattern order finally showed up in the post. I know you’ll be asking so here’s the collection:

NewPatterns

I felt I was being rather restrained at only 5! That’s 2 older Marcys and a new Katherine, plus the Mizono dress with the cool hem and a top that didn’t get great reviews except from Margy of A Fool for Fabric blog. She looks amazing in her several versions and for $1.99 plus postage it’s not a big outlay if it doesn’t work with the fabric that I planned. Anyway, I now have a great selection of Tiltons! So many of the other patterns are just too basic to bother with but the sisters share some of my funky/artsy design sense with challenging sewing. I would really love to see the stats on how popular their patterns are compared to others. Either I’m just drawn to the bloggers who sew this style or there’s a lack of other designers who create the kind of patterns that get my creative juices flowing. Since I have to do a lot of fitting and adjusting to a pattern anyway, I’d rather spend my money on something I can’t easily reproduce from scratch. I’m really done with pattern collecting for the time being.

What else? Oh yeah. I’ve been working on old shoes. I’ve had these green nubuck Birkenstocks since 1996.

BirkiesOld

They’ve been resoled but the tops were grubby and boring. I decided to take a leaf from my online buddy pao’s book and paint them.

BirkiesRevamped

Pretty! Shiny! I cleaned the leather first with a suede brush and applied light copper shimmer Pebeo fabric paint using my fingers and a small paintbrush to get into delicate areas where my finger wouldn’t fit. I let it all dry and then gave it a thin wash of chocolate shimmer mixed with Golden gel and GAC mediums to antique the bright copper a little. When my sandals were really dry (a couple of days), I polished them with neutral shoe wax. And now I have shiny new Birkies! They’ve already passed the Granddaughter Glitter Test with a “cool” rating.

The second pair of shoes that I revamped are my near-equally ancient Doc-Wannabees.

DocWannabees

Ever since I had to wear black oxford shoes for my school uniform I’ve had a fondness for the no-nonsense oxford lace-up style. (Our warm weather uniform of saddle shoes…not so much…) These red-brown clunkers are probably only still in my collection because I love the idea of them rather than the reality. They are uncomfortable. You can tell because I actually bought gel insoles to try to make them more wearable. Not. The heels slid up and down with every step. So I decided to borrow a solution from my littlest granddaughter’s pedorthist (she was born with clubfoot) and glue a leather piece in the heels to stop the slipping.

DocWannabees_det

I even got matching leather and contact cement for this project. It worked OK, especially after I removed the gel insoles, but sadly these will never be considered Walking Shoes. They are wearable for short distances only. I can’t walk 10 kilometres in my Birkies either so I shouldn’t feel so bad about it. But at least I now won’t be chucking them in the donate pile.

Friday, May 10, 2013

A Visitation

We had a visitor the other day. Not the kind of visitor you would want really since he or she perpetrated this crime:

RaccoonDamage

That’s our water garden with the spout pulled out and chewed up, the water half drained out and the sponge filter from the pump shredded. We suspect it was a raccoon. Again. They love the running water which unfortunately attracts their attention to our upper deck. Grrrr… It took T-Man nearly two days to fix it since he decided it was a good opportunity to take the whole thing apart and plug the leak in the bottom of the pot while he was at it. He had to make a new bamboo spout too and then reassemble everything. Just in time for some new water plants that we bought yesterday at the garden shop. Hopefully the bandits will leave it alone now. Maybe?

The weather has been lovely and warm. Here’s the veggie garden at the moment:

SpringVeggieGarden

You can practically watch things growing! Those masses of Spanish bluebells are really a pesky weed. Pretty for a few weeks in spring but they are everywhere and cannot be easily discouraged. I blithely pull them out right after they finish flowering – leaves and occasional bulbs and all – and they just keep coming back every year. If only the edible plants were nearly as hardy and prolific. I’m done with planting this garden for now. The beans are in which are the last seeds to be planted directly. Now we just water and weed and harvest as necessary. Sounds easy, doesn’t it? Ahem.

And I have one FO for you:

Flat Rat

FlatRat Completed:  May 7, 2013

Yarn:  bits of leftover sock yarn in speckled brown/grey, grey, pink, red. Two 3-sided beads for eyes. Wool stuffing for head.

Needles:  Clover Takumi bamboo, 2mm

Pattern:  Flat Rat by Susan Glinert Stevens (aka Fleegle), free pattern on her blog.

Comments:  This little guy is so dang cute (in a warped sort of way) that T-Man absconded with him! At least I have enough yarn left to make another one. The pattern is not particularly easy to follow but the results are worth darning in a lot of ends.

FlatRat_det

OK, this should hold you for the nonce since if I’m going to get my fish and chips lunch I’ve been promised at Granville Island today, I’d better get a wiggle on. Or it’ll be supper instead.

Monday, May 06, 2013

8! …And Counting

Happy Blogiversary to me! Yes, Damselfly’s Delights is eight years old today! Who’d a’thunk it, eh? Every year I say that I can’t believe I managed to keep this up so long. This is post number 1352. Obviously I found something to babble about, huh? In my whole life any other journal I ever tried to write lasted about 4 days. I think it needed a keyboard or something. And of course YOU, my dear readers! Anybody actually been hanging about since the beginning?

Reading back in my posts, I’ve perhaps gotten a little less gossipy and indiscreet over the years. Not less personal or opinionated (heaven forfend!) but maybe more circumspect. At least I hope so! Less names named anyway. I don’t really want to breach anyone’s privacy or to be rude. I’m sure I’ve transgressed despite good intentions but I do try. I’m not a very good diplomat I’m afraid. Too forthright.

And I know my photos aren’t up to the wonderful pictures you get on some blogs. I am not really very good at it and I often forget to take a photo when I should. I’m even worse at posing for portraits! There’s no place in my house where there’s enough light and also without distracting backgrounds. Outdoors is also problematic. It rains a lot here for starters. T-Man is occasionally willing but doesn’t really get what exactly I want him to shoot. He doesn’t see that my hair is out of place and there’s a fold in my jacket or I need to hold my hands differently. My little old digital camera is tedious to set up for timed photography too so it’s at least as hard to take my own photos of myself. And no matter what I do, I always feel – and look – dorky and awkward. (Probably because I am dorky and awkward.) Now you know why I take so many photos of garments on Debbie Double. She’s much more cooperative and I can arrange her more easily.

I know the focus of this blog has shifted as my interests have. I used to do a lot of jewelry and beadwork. I don’t even wear it anymore. I’m still knitting every day but not spinning as much even though I still love it. Dyeing still comes in but only when I’m needing something dyed and it could be either natural dyes or synthetics. Weaving hasn’t been as large a part of my crafty world in the last decade but I keep saying I want to do more. Now that there is a reinvigorated sewing interest maybe that will encourage me to weave fabric for clothes. Who knows? I just go where my desires take me. And document it all on here.

What else to talk about today, besides the boring fact that I have another migraine? The weather has been super warm and sunny. I only managed to get my tomatoes transplanted into bigger pots before it actually got too hot (25C) to work in the garden yesterday afternoon. We aren’t used to this summer-like weather yet! Instead I went up to my studio (where it was also very toasty) and started working on the Celadon Dress project. That’s the handwoven dress refashion that I mentioned yesterday. I did manage to find my notes from when I started it – in 1997! So it’s nearly sweet sixteen, poor thing. About time it got turned into something functional instead of taking up space in the storage closet, no?

M7974 This sleeveless dress (pattern is McCall’s 7974, circa 1995) has a plain scoop neck, buttons down the front and straight tucks on the front and back bodice. I borrowed this photo from eBay because I can’t find my copy yet. It doesn’t actually fit me as badly as I thought at first. The biggest problem is the extra bulk in the facings and tucks. I’ve already picked off the facings and will replace them with muslin which is much thinner and presses flatter than the handwoven cotton/rayon fancy twill. Of course even though I was gentle with the seam ripper, now the fabric is starting to fray rather badly so I’m having to handle it even more carefully. I wish I hadn’t finished all the seams by serging them off! Even though that has likely kept the thing from disintegrating over the years when it was banished to the back of the closet. Here’s what it looked like before I started:

CeladonDress_before

And here’s how badly the shoulders fit:

CeladonDress_shoulder

I’ve already taken out the shoulder seams and will recut the armhole/shoulder/neckline area to fit me much better. The tucks need to be lengthened to reduce the fullness some more around my middle. I’m trying to decide if I should trim the back of the tucks to reduce the thickness some more too. They’re over an inch wide. Also the hem needs to be shortened to somewhere around the knee. I should go digging in the attic stash to see if there’s any leftover fabric hiding. I have no idea if I was planning sleeves for this dress and if so, they are missing. I would like some cap or short sleeves anyway but probably can get them out of the hem if I have to. As you can see on Debbie, who is exactly my height, the thing practically reaches the floor! I would rather have a shorter dress for summer.

As always, more later. I’m going to go try to dig up the patch for the Japanese indigo now. If my headache will let me. What’s with this anyway? I haven’t had migraines for ages and now 2 within a short time? Sheesh.

Sunday, May 05, 2013

Sunny Days

Spring has warmed up around here and everyone thinks it’s suddenly summer. Out with the shorts and the flip-flops, the hats and the sunscreen! The sun is shining and the temp is over 20C! Whoo-hoo! Yes, we get very excited about blue sky. We don’t see it very often. At any season.

So I got the greenhouse cleaned out and prepped yesterday for the tomatoes. But I’m not going to put them in quite yet since nighttime temps are still a little iffy. However I do have to get out there and transplant them into bigger pots. Especially since I dropped half of them when the tray fell off the railing upside down. I think I luckily only broke one. I have extras on purpose. They are totally falling out of their little half-flats now. Poor things. I also need to finish prepping the raised bed where I plan to put the Japanese indigo this year. I should be outside right now before it gets too hot in the sun. Yay! I can actually say that for the first time this season. Heh.

Instead, I’m giving you my next FO, this time a knitted one:

Orange Aeolian Shawl

OrangeAeolian

Begun:  February 11, 2013
Completed:  April 30, 2013

Yarn:  suri alpaca 2-ply laceweight, mill-spun, alum mordanted and dyed by me in a woad hot-process (beige) and then overdyed in madder. Used only 1/2 of the whole gigantic skein! Unfortunately I’m not really certain of the exact yardage.

Beads:  Czech glass seed beads, 6/0, silver-lined transparent pink. Used 5-1/2 strands of a 6-strand hank.

Needles:  Addi Lace circulars, 3.25mm, 24” length.

Pattern:  Aeolian Shawl by Elizabeth Freeman, free pattern from Knitty Spring 2009 issue.

Mods:  Used a 3-st edging as for the larger shawl pattern. Then I knit 6 repeats of the Yucca chart and 2 repeats of the Agave chart plus the transitions and before the edging. This gave me an intermediate-sized shawl.

OrangeAeolian_det Comments:  This is still a pretty large shawl! 30” from neck edge to tail and about 60” or so from wing point to point. It’s also quite heavy with the suri alpaca and all the beads and it’s just a little bit fuzzy but quite soft. I’m glad I used the smaller needle size so it’s not too flimsy to support the weight. It’s a lovely pattern utilising the Estonian nupps and bind-off as well as the lush amount of beads. Though there are lots of charts the pattern was not really difficult to follow but it did take some concentration. Happily I learned how to apply beads to decreases too which I hadn’t known before. Elizabeth is an amazing lace pattern designer!

Not quite sure where I’m going to wear this beast and styling it is going to be kind of a challenge. The colour goes well with my wardrobe but the size is larger than I usually wear. Anyway it will have to wait for cooler fall weather or a chilly summer evening before it will have a real outing.

In sewing news, I’ve resurrected a dress that I started to make sometime back in the Cretaceous Era. I never binned it because the fabric is my own handwoven and I love the soft light green colour of the rayon yarns. It just doesn’t fit me. I remember sewing like mad and then trying it on and being so disappointed that I just hung it in the closet! And didn’t quite forget about it but didn’t quite know what to do with it either. That was obviously before my new era of learning so much more about garment shapes that suit me and fitting the shoulders. Also about making a muslin before cutting into very special fabrics! It’s super-oversized so at least I can cut it down into something more wearable. I also need to go dig in the attic stash and see if I can find any remnants of this fabric in case I need them. I don’t usually discard handwoven scraps so there should be some lurking about. Though I could probably get short sleeves out of the bottom of the skirt because it’s so long and still have a knee-length hem left. This project has a deadline: the next guild meeting on the 16th. We’re having a social and fashion show and I need something new to wear. More on this project anon.

Best head out to the garden now. It’s already over 20C and climbing! My poor little seedlings need watering. Again. No I am NOT complaining. Unlike a lot of the rest of the Northern Hemisphere we are actually experiencing a more normal spring, especially when compared with the last couple of years. Of course things could change at any moment! Life is change, right?

Friday, May 03, 2013

Some Sewing

Well, I finally have photos! Guess I’ll start with some of the FOs I’ve been collecting up.

Blue & Brown Denim Skirt

BlueBrownDenimSkirt

Completed:  April 2013

Fabric:  heavy but soft denim, brown warp and blue weft, remnant from my ex-neighbour’s stash.

Notions:  1” wide waistband elastic. Mettler poly sewing thread.

Pattern:  self-drafted straight skirt, elastic waist, big pockets. First used for the green Sweat Skirt in 2011 which gets quite a lot of wear.

Mods:  none except that I frayed the edges of the pockets to show off the unusual warp and weft colours.

Comments:  The pocket embellishment might have worked better if I’d actually cut the pieces on the straight grain. Unfortunately they’re a little wonky! They should fuzz up more after a wash and machine drying too. I stitched this all using straight stitches on the sewing machine. The side seams are flat-felled from the wrong side and topstitched. Apart from the fringed pockets, everything is completely finished on the inside.

This was a good use for a freebee piece of fabric and the colours should coordinate with several pieces in my wardrobe. I do need a brown top though so that’s on the agenda for the near future.

Blue Balloon Over-Tunic

BlueBalloonTunic

Completed:  April 2013

Fabric:  navy blue linen (?) from the deep stash. 54” wide, 1m.

Notions:  Gutermann poly sewing thread.

Pattern:  Modifications of my self-drafted pattern last used for the black & grey slinky top. It’s a tent-shaped sleeveless jumper that stops somewhere above the knee.

Mods:  I straightened out the hem and added a little extra width to the armholes and neckline. There is a seam at centre back to fit on the fabric efficiently. I also made a wide pocket piece. I drew the changes directly on the fabric with dressmaker’s wax crayon so I don’t really have a pattern for this variation.

BlueBalloonTunic_frontadjust BlueBalloonTunic_backadjust

Comments:  I’m not really sure of the fibre content but it’s a fairly coarsely woven fabric that takes a perfect press so likely there’s at least mostly linen in it if not 100%. I only had 1 metre of this stuff but I managed to get a longer top out of it than I had planned. I sewed the hem leaving part of the side seams unstitched so I could tie the ends in knots on either side. This poofs the bottom out in a pleasing way. The pocket went centre front above the bust. It’s mostly decorative but could be used to hold my iTouch or a hanky.

I sewed the whole thing with a straight stitch and turned the seam allowances under and topstitched them so there are no raw seams anywhere. This was easy to do because the fabric pressed so nicely flat. It also creases quite a lot when worn but that’s just fine with me.

Another piece of fabric that I’ve been saving for eons is now a wearable garment. Yay!

And here’s yet another 2 garments that I finished this week:

Chocolate Cake Pants

ChocolateCakePants

Completed:  April  and May 2013

Fabric:  French terry, brown, actual fibre content unknown, 54” wide 2m. Recently purchased at Dressew for $6 per m. Used with the smooth knit side as the right side.

Notions:  1” waistband elastic. Poly sewing and machine threads. 6 - 1/2” vintage buttons from the stash.

Pattern:  Traced from a favourite pair of yoga pants. (Not that I do yoga. Just that they were comfortable!) Style is a narrow leg with a slightly boot-cut hem.

Mods:  I needed to shorten the hem an inch or so from the original pair. For the second pair I didn’t have enough for full length so I made a capri-length leg with vented cuff.

Comments:  This is a perfect pattern! They don’t look that exciting on the hanger but they look great on. They fit much better than the last several pairs of leggings or pants that I’ve made. I also like the weight and drape of the French terry. This must be the fastest that a piece of fabric has gone from purchase to sewn up in decades!

ButtonCuffsThe non-functional decorative buttons for the capri version were a last-minute inspiration. They don’t really match each other perfectly but they use up some of the very old buttons saved in Granny’s Button Bag that I inherited from T-Man’s grandmother.

I call these Chocolate Cake because they are a wardrobe staple as described by Tasia of Sewaholic’s “cake vs. icing”. I will be making more pairs in both lengths soon I’m sure.

There are more factory-made garments lurking in my wardrobe that need to be “rubbed-off” before they wear out completely. The cool thing is that I like the knock-off version better than the original! I can adjust for fit and use better quality materials and stitching for longer-lasting pieces. Take that, garment industry! Better clothes are at my fingertips. BTW yesterday I wore total me-mades right down to the undies. Only my sandals, glasses and hearing aids were not. I’m slowly working on replacing my wardrobe with my hand-made clothing. I’m hoping eventually for at least 90%. Right now it’s about 50% of what I actually wear day-to-day.

I haven’t stopped knitting either. Flushed with the success of the yellow/red/green version which I’ve barely taken off since I finished it, I started the second Ruby Tuesday sweater. This one uses the yarn I was originally considering but didn’t think I had enough. I will be content with cap sleeves if necessary but I. Must. Have. It. Plus I have one more FO done but that will have to wait for the next post.

Meanwhile feast your eyes on this flower on my smallest disocactus:

OrchidCactus

Isn’t it pretty? My flowering cactuses (Christmas, crab and disocactus) haven’t even gone outside to their patio for the summer yet. One of the Christmases is still flowering sporadically and there are already several buds developing on the disos. This was the first one to open. It’s as big as my hand! So magical. The plants themselves are rather unattractive and annoying. The pots are top-heavy and need to be propped and weighted or they fall over. There are teensy prickles that get stuck in you if you brush over the plants and they are long and strappy, chewed-up and decidedly homely things – until they bloom.